

The support levels are thirteen for the Germans and six for the Soviets. Any Soviet fortifications and surviving supports will remain in play, so while six support points won't go too far for this game, a Soviet victory could see the odds slowly building against the Germans. One good reason why the Germans need to press hard and aim for an early victory.

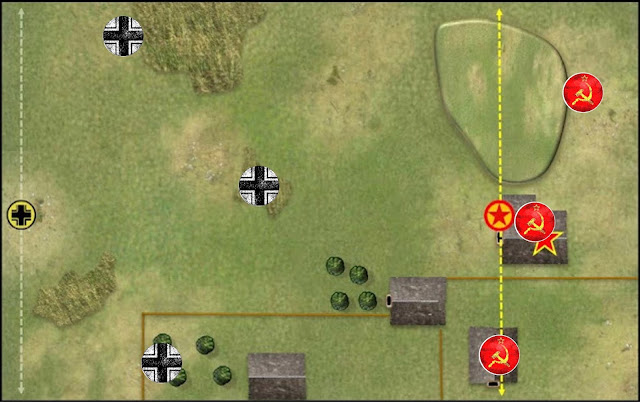
The first thing that strikes me when I look at the map is that a mortar barrage would be extremely useful. There is a lot of open ground to cross and the ability of a barrage to suppress units and close off areas of the table will be invaluable. There seems to be two possible avenues of approach to the objective building and these are either through the village on the right, or across the rough ground and the hill to my left.

Regardless of which approach, the barrage should be able to close down Russian activity on one flank or the other. This should allow me to concentrate the LMG fire of the panzer grenadiers onto any active Russian units on the opposite flank and hopefully gain some freedom of manoeuvre.


The dilemma in deciding on the best support is do I go for some armour, or more infantry? If I take the mortar barrage then I could add a Flammpanzer or the StuH42, both of which provide a lot of punch and could make a big difference. Like my Tiger though, in Scenario 3 'Panzer Marsch!', it could so easily be lost to an AT gun and I'm certain the Russians will have one of those on hand for just this eventuality.
Nonetheless, I decide to take the risk and opt for armour. With the bitter taste of my earlier experience still fresh in my mouth, I intend to bide my time and deploy it where it is most needed, and once I have a reasonable idea of Soviet deployment. After weighing up the options, I can't resist the temptation of the Flammpanzer. My only fear? I see it go up in flames before it has a chance to do likewise to some Soviets.
German support then will be a mortar barrage, a Flammpanzer, an Adjutant and a demolition team. The latter in case there are some minefields I need to remove.
I have a lot of modifiers for the Force Morale roll (+2 for elite, +1 for men's opinion and +1 for the platoon leader's outlook) and anything but a one will give me eleven. So, naturally, I roll a one. I should have seen that coming. Nonetheless an FM of ten is higher than the Russians, who end up with nine.
With few options for my JoPs I decide to use only three patrol markers. I'm less concerned about deceiving Dave and more concerned about getting my JoPs where I need them most. My roll for the patrol phase is a significant improvement over that for Force Morale and I get the maximum of three free moves. To this the scenario allows one further move, plus I have initiative, which means I make five moves before the Russians. At the end of the Patrol Phase I end up close to where I had hoped to be and so JoPs look like this:
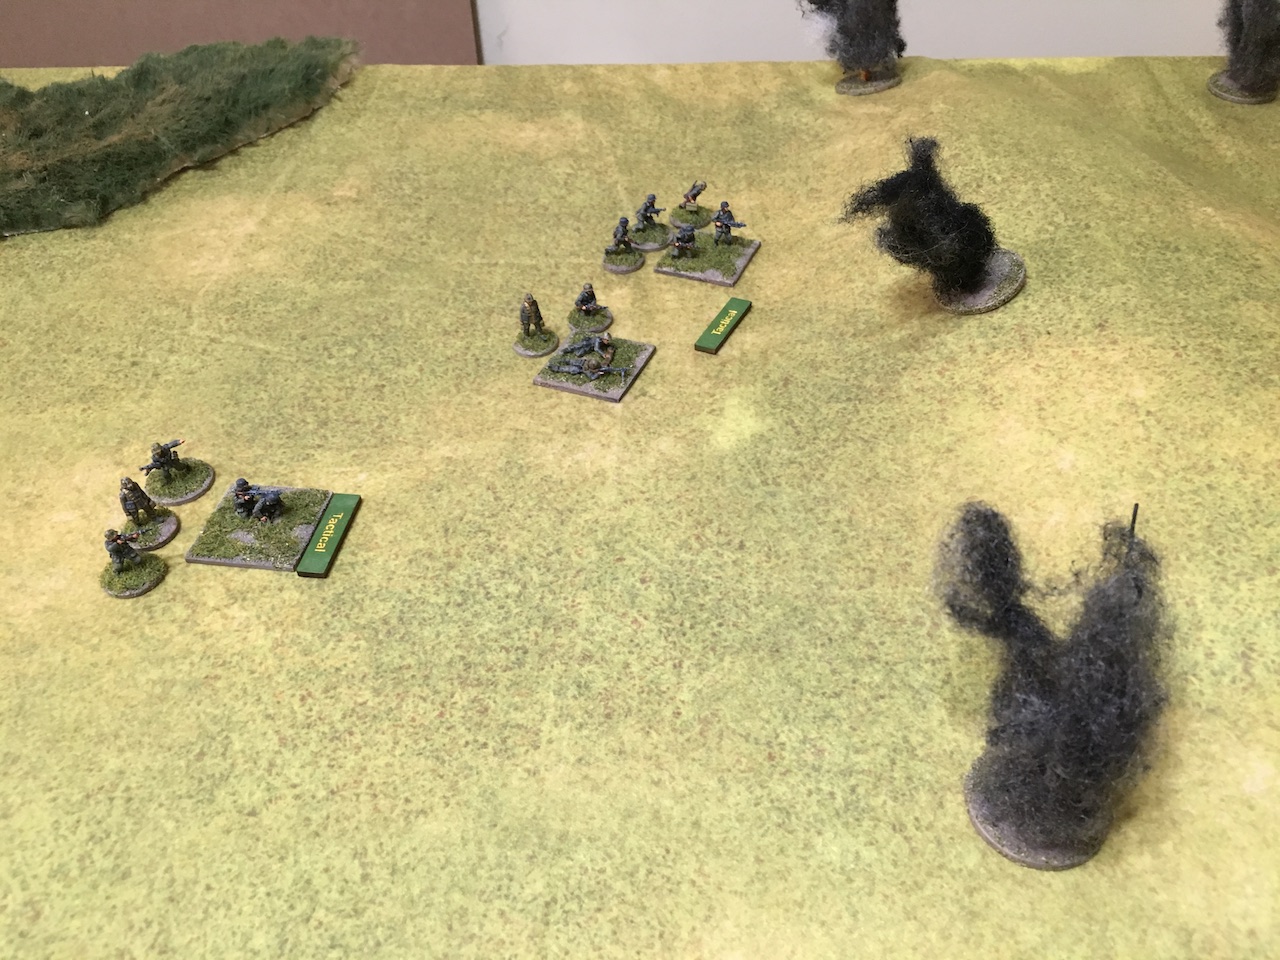
The opening command roll results in a double phase for the Germans. Too early to be of real use unfortunately, but not totally without its uses. Across the two phases I bring on all three of the German squads, one from each JoP and all placed on Overwatch. I also accumulate a few CoC points and I'll be eager to get a full CoC die before the barrage comes down to ensure I can keep it active should the turn end.

 |
| Two German squads ready to cover the hill |
 |
| A lone squad covers my right flank |

The Russians watch with interest, but elect to do nothing when it comes to their phase.
Next German phase and the German Unterfeldwebel (SL) and the FO appear in the centre patch of rough ground. Meanwhile, one German team starts to move forward tactically, while another lays down covering fire on the objective building. There's no hurry here and with teams placed on Overwatch and others moving tactically I'm taking it easy, not knowing what the Russians have in store.
 |
| Unterfeldwebel and FO deploy. |
 |
| Teams edge forward cautiously |
 |
| Covering fire hits the house |
The Russian command roll delivers a double phase, but Dave decides to keep his force concealed and shows considerable restraint. It's a bit unnerving! Talk about the empty battlefield.
With that the Germans have the FO contact the mortar battery and once again have teams advance tactically. While there's not much happening, I am rolling lots of 5s and single 6s and my CoC points are accumulating slowly but surely.
Once again the Russians choose to do nothing with their phase. Dave is clearly waiting for me to show my hand or do something rash, but I don't intend rushing into anything. With the next German phase the FO calls down a ranging shot onto the hill and it falls exactly where I want it. Once again covering fire is laid down on the house. When the barrage comes down I intend moving up slowly behind it and working my way towards the objective building.
 |
| The ranging shot comes down....but where are the Russians? |
 |
| Germans edge forward |
Neither the ranging shot or the threat of the barrage provokes a Russian reaction and once again they elect to do nothing during their phase. The next phase sees the the barrage fall with full effect on the hill. There may not be any Russians there yet, but there is a JoP just behind the hill that is now in the centre of the barrage. One of the German LMG teams lays down covering fire and the Germans start to edge forward tactically. There is no reason to hurry only to end up being caught out in the open, so moving tactically is the way to go.
 |
| Barrage comes down and teams start to move |
The Russians persist in staying concealed and so my FO calls for the barrage to move back 6". With that the squads on my left flank continue to move forward tactically behind the barrage. Once again we lay covering fire on the house.

Nothing so far has tempted the Russians to reveal their hand. The next German command roll generates a double phase. With that I decide I should make a move and exploit the fact the Russians are unable to interfere with what I chose to do for the next two phases. My right hand squad moves at the double towards the fence line and a roll of 15" sees them cover the ground very quickly. That took Dave by surprise.
My squads on the left also take advantage and advance behind the barrage. With the quick passage of phases I've already accumulated two CoC dice. I intend to hold on to one so that in the event of a turn end I can maintain the barrage. The other will allow me to keep a few options open, perhaps for a critical interrupt.
 |
| At the double - a full 15" |
 |
| Some shock, but it's worth it to move so far |
 |
| Advancing behind the barrage |
The next German phase and the squad on my right flank moves up to the fence. That brings them within 6" of a Soviet JoP. Surely this will provoke some kind of response in the next Russian phase? On my left the LMG teams all move up tactically behind the barrage.
 |
| First World War style - moving up behind a creeping barrage |
 |
| At the fence and closing in on a Russian JoP |
It comes as no surprise that the rapid German move to the fence line generates a swift Russian response. The empty battlefield is about to burst into life. My squad suddenly finds itself confronted by two Russian squads, both in close proximity. I should have considered an interrupt with a CoC die, but in the heat of the moment it completely slipped my mind. Probably a mistake, as the Russians open up with 40 dice worth of fire.

The storm of fire results in 26 hits, leading to three dead and 12 shock. To make matters worse, the final Russian gesture is to hurl a few grenades and that's enough to break the squad. They fall back 15" and German FM drops to 8. That hurt, and this squad will be ineffective for some time.


While Dave is happy with his fire on this flank, he feels threatened enough by the creeping barrage that he uses the CoC die he's acquired to move his JoP from behind the hill and away from my encroaching squads.
The next German phase the barrage shifts towards the right with the German squads creeping close behind. While I'm happy with progress on my left, the crippling of my squad on the right means that flank is in some danger, as is my JoP. I have yet to deploy the Flammpanzer, but the time may not be far off when I call on its services to shore up this flank.
The Russians are keen to take advantage of the collapse on my right and deploy a third squad. It fires on my broken squad and wounds the junior leader, but German FM holds. In an aggressive move one of the other squads advances over the fence, a sure indication Dave intends to make a play to capture my JoP. Suddenly the defender has turned attacker.


Finally a fourth Russian squad deploys, dug in and facing to my left to cover the approach of my squads behind the barrage.
While that's a lot of Russian units on board, they are all in a fairly small area, perhaps not the wisest deployment given I have a barrage edging that way.

I now have a clear idea of where the main Russian defence is situated. My plan is simple, I will shift the barrage over to the right and use it as cover so my two squads on the left can close in on the objective building. I will probably have to use the Flammpanzer on my right, as it's the only thing I have left to deploy that can defend that flank.
In my next phase, the FO shifts the barrage a further 6" right and my squads continue to follow it. I also rally some shock off my broken squad and finally the Flammpanzer makes an appearance. From this position it is out of range of all Russian units, so Dave doesn't reveal any AT gun just yet, he decides to wait and see what I have planned.
 |
| The barrage edges closer |
 |
| A target rich environment, as they say. |
 |
| The Flammpanzer appears |
The Russians fire at my squads that are following the barrage, but the fire is ineffective. In the following German phase I can't activate the Flammpanzer, but the barrage creeps inexorably to the right and hits two of the entrenched Russians squads. The Russians suffer some shock, but the key thing is that the barrage now pins those squads and allows my left flank to continue to work their way to the objective building. If I can play this right I should be able to continue to shift the barrage over the Russian squads and once it clears the objective building I can move in to it before the Russians are able to stop me. I still have two CoC dice and I'm hanging on to these to make sure I can keep the barrage active should the turn end.


With the barrage holding some of the Russians in place I move my squad on the left in an arc up the hill and behind the barrage, but heading towards the objective building. My centre squad adjusts its position to face the village fence line.

Now we see a Russian reaction. The first suprises me a little as Dave brings on the Russian Leytenant (SL) and advances two of his squads forward. He's intent on driving my broken squad off the table, but he also has an eye on capturing my JoP. One squad moves towards my broken squad, while the other climbs over the fence and swings around to face my centre squad. This seems quite bold considering the Flammpanzer is nearby (although still out of range).
However, the move is not to be unsupported and finally a Zis-3 76.2mm gun appears on my right. There is a line of sight to the Flammpanzer as its turret can be seen over the fence, so there's nowhere to hide. If the Flammpanzer can be knocked out, then Dave should have little problem mopping up my exposed right flank. This is a critical moment in the game. If he succeeds then my progress on the left towards the objective building may come to nought.
 |
| Russians advance, supported by a Zis-3 |

I can't just sit here and let him fire at me, so I use one of my CoC dice to interrupt and move the Flammpanzer. I can't actually move out of the gun's line of sight, no matter how fast I move, so my best option is simply to close the range and hope I survive his fire. By driving flat out I will also make for a more difficult target. The movement roll brings the Flammpanzer within range of both Russian squads and the gun, so now it all comes down to how effective the Russian fire can be.
Dave uses both the junior leader's CI to target the tank which cancels out the benefits of my flat out move. All up he needs seven or more to hit and he rolls a seven. The hit results in 3 AP strikes, but I roll 2 defensive rolls, and the net result of one hit means a point of shock and restricted movement. More important, the tank survives.

The next German command roll is critical for me, I desperately need dice that will allow me to make a 3 and activate the Flammpanzer. The dice are kind and allow me to pile pressure on the Russians. First up, naturally, we fire the Flammpanzer at the Zis-3. My interrupt was well worth it, as the move has brought me into range. The flamethrower does its deadly work, inflicting four casualties on the gun crew, including the junior leader who wounds, dropping Russian FM to 8. Doubling shock means the crew also suffer four points of shock. The gun's not out of action just yet, but that severely limits its effectiveness.
 |
In the same German phase the barrage adjusts another 6" to the right and one of my squads continues to follow it towards the objective building. Following the clarification in the CoC FAQ the entrenched Russians under the barrage enjoy the benefits of hard cover (entrenched = hard cover, plus pinned, less one level of cover for the barrage results in hard cover). They are not suffering any casualties and shock is low, but they cannot move and that is the key.
 |
| Germans close in on the objective building |
 |
| Russians pinned under the barrage |
The next Russian phase and Dave is desperate to try to take out the Flammpanzer before his AT gun is knocked out. No surprise then that this is his first activation. Before he does though, I use another of my CoC dice to interrupt. This is my last CoC die for now, but I decide that the barrage has done a fine job and if the turn ends I can live with the consequences. If it means I have a mobile Flammpanzer and the Russians don't have an AT gun, I think I can deal with the Russian squads without the barrage. And who knows, perhaps the turn won't end soon anyway?
The Flammpanzer fires again and this time it's deadly, resulting in four kills that wipe out the remaining crew before they get a chance to fire. Russian FM drops to six. With that the German fortunes for this game take a big swing in their favour.
Dave doesn't give up just yet, but I think we both sense this has been a turning point. He moves one of his squads at the double towards the orchard sheltering my broken squad and one of my JoPs. They get within CC range which is enough to see the squad amass even more shock and rout again. This takes them to within 1" of the table edge. While that puts the Russians close enough to capture the JoP, it also puts them comfortably in range of the Flammpanzer.
 |
| Russians close on the JoP |
 |
| but also get close to the Flammpanzer |
The Russian squad along the fence can target my squad in the centre, but their tactical status finds them in good cover, so the fire has little effect.


The next German phase could well decide things. The Flammpanzer is activated and targets the Russians near my JoP. Once again it does deadly work. The Russians suffer five kills, one of which is the Serzhant (JL) who is stunned, taking Russian FM down to 5. With six points of shock the squad is pinned.
 |
| Don't mess with the Flammpanzer |
I sense Dave is hanging on in the forlorn hope of a double phase or something miraculous. His command roll gives him a single phase and so he uses this to have his Leytenant take three points of shock off the squad in the orchard, while his squad behind the fence fires on my centre squad, but once again it has little effect. That is all he can do while his other two squads remain pinned under the barrage.
The next German command roll is full of options, including activating the Flammpanzer and when Dave sees this he sees no point in watching the misery unfold any further and with that, he surrenders. Victory for the Germans for the game and for the campaign.
That was an interesting scenario. Dave really held back on his deployment and that had me worried for a while. When he did deploy it was to great effect, shattering my right hand squad and taking them out of the game with a single fire phase. However, the German mortar barrage really restricted Russian options and once all his squads had deployed they were confined in a relatively small area, one where the barrage could be very effective. While the Germans were making progress on the left, using the barrage as cover to advance, my right was severely compromised with the breaking of my squad. So that brought us to the critical moments of the game. The Flammpanzer needed to shore up that flank and push the Russians back, but it meant surviving any anti-tank fire. The two interrupts proved important, but surviving the first shot from the Zis-3 was the game changer. Had the Flammpanzer gone the same way as the Tiger back in Scenario 3 this might have ended very differently.
The campaign itself has been interesting. German progress was mixed in the early games. If there was a critical game it was Scenario 4 'Hold the Line' , the battle for Butovo village. We both fought this one tooth and nail, taking a lot of casualties, but each believing one last push would bring victory. In many ways the campaign probably hinged on this scenario, as it's the first time the Russians have a really good shot at stalling German progress. The German victory came at a price, making one German platoon ineffective. I came very close to losing that scenario. If that had happened and I'd had to re-fight it, taking similar losses, then victory would have made progress later that much harder. In addition, had that scenario gone to a replay, then the Germans would have been unable to attain a campaign victory in seven games, denying them a major victory. If the Russians can repeat that sort of determined defence in Scenario 6, then they can throw the Germans right off their schedule.
Another excellent and enjoyable Pint-sized Campaign.
You can find all the AARs for the campaign and other related posts at the Campaign AAR Page.
Another excellent and enjoyable Pint-sized Campaign.
You can find all the AARs for the campaign and other related posts at the Campaign AAR Page.


