Showing posts with label Game Reviews. Show all posts

Wednesday, 23 September 2020

Ultracombat Normandy review

Ultracombat Normandy is a set of Second World War wargame rules from Dishdash games, the creators of Skirmish Sangin. The rules describe themselves as 'an easy, fast-paced set of squad-level skirmish wargames rules for depicting the frenetic close-ranged combat that occurred during the Normandy Campaign'.


The creators of Ultracombat Normandy were at Cancon in January this year and my regular opponent Dave joined in a small demonstration game to get a feel for the rules. His initial impression was a good one, so much so that he bought the rule book. We recently finished the Chain of Command campaign 29, Let's Go! and before we embarked on another campaign we thought we'd play a few other rules and periods.

Ultracombat Normandy is pitched at a similar skirmish level to Chain of Command, however where it seems to differ most from those rules is that players don't just operate the various teams that make up a squad, they also handle the actions of the individual men within those teams. 

Each squad is broken down into what the rules refer to as 'elements'. These elements can be made up of a single character in the case of NCO's and officers, or a number of soldiers in the case of fire teams. For example, an American squad is made up of five elements - NCO, Junior NCO, Rifle team, BAR team and Scout team. Each element has a card that includes its various characteristics such as morale, spotting ability and firepower. However these are not simply quick reference cards, they are also the mechanism for how the sequence of play in each turn unfolds.

Every turn each player selects one element to activate by taking their card and placing it face down on the table. When both players have done this the cards are revealed and these two elements will be the ones that will activate first during the turn. The element with the higher experience rating will go first, in the case of the experience being the same the players dice off. Once those two elements have carried out their activations the players repeat the process by selecting the card for the next element they wish to activate.

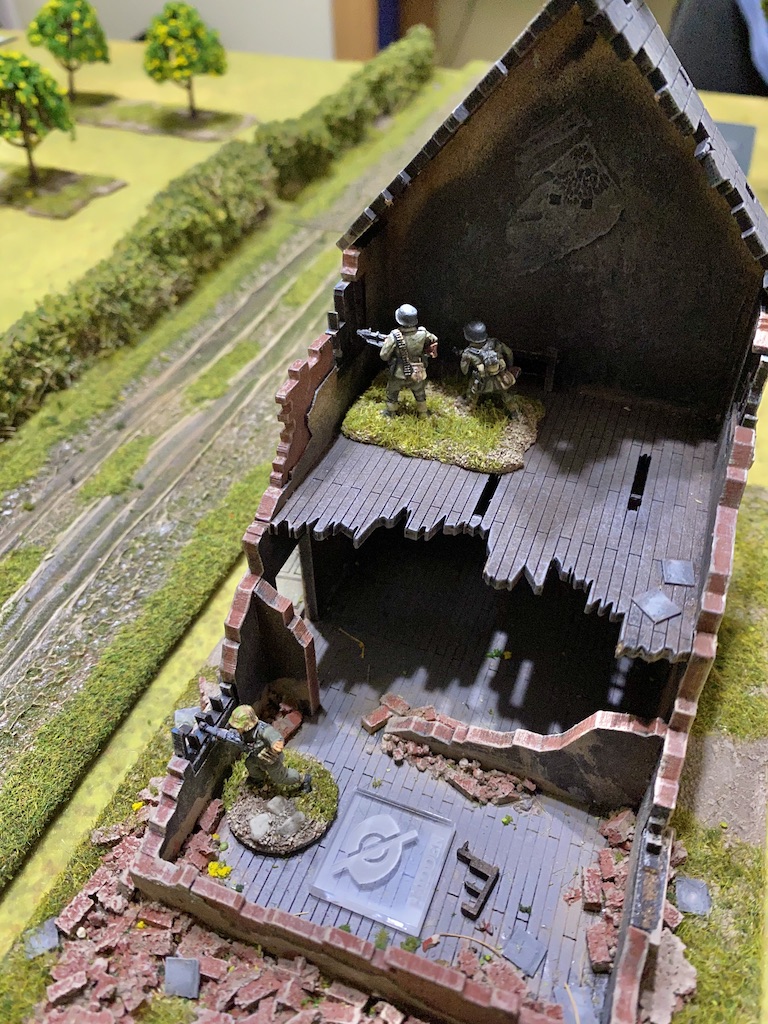
We set up a small 4x4 table and ran a simple scenario where two American squads were trying to take some damaged houses from a solitary German squad backed up by an additional MG42 team. So, what were our impressions?

The mechanic of using the cards to determine the sequence of play sounded as though it offered another variation on breaking up the predictability of IGO-UGO play sequence. It also added an element of tension and decision making as to which element you should activate first. However in practice I found it unsatisfactory. There were a couple of reasons why. 

Elements can be rated Novice, Average or Veteran and we found that as most of the elements on both sides were Average virtually every card play was resolved with a dice roll. It was, we were to find, the first of a lot of dice rolling that was to come. 

Secondly, I found the activation of one element at a time tended to detract from thinking tactically about using the coordinated action of several different elements. The tendency was to focus on the single element that activates. This is not dissimilar to the way play can unfold in Bolt Action. However, unlike the random sequence that occurs in BA, in these rules the player can control the sequence of their activations by selecting which cards to use. Nonetheless it creates a certain stop-start nature to the way those activations take place and I think that detracts from the flow of the game. 

I recently reviewed the board game Undaunted Normandy (similar title, I know) which also uses unit cards to drive activations, however it does it in a way that means in each player turn it's possible, under certain circumstances, to activate up to three units. This makes a difference because it allows the player to create a tactical sequence to propel the game. For example, a player could play the MG team card to suppress an enemy unit before playing a scout team card to explore more terrain and have a rifle team advance in their wake. 

Undaunted Normandy also uses cards to propel the sequence of play

It's not that you can't create that sequence in Ultracombat Normandy it's just that I felt it unfolds in a more disjointed manner. As a result I found I wasn't always thinking in broader tactical terms. Having chosen the element you wish to activate the player then carries out actions with the men in that element. Each man has three action points and spending those action points is how the characters that make up each element carry out activities like spotting, moving and firing. We played the game using 20mm miniatures and used the suggestion in the rules that we convert measurements from inches to centimetres. I'm not sure that's a great idea. 

With each action point (AP) a character can move 6" (or in our case centimetres), which means a character or element using all three APs to move would cover only 18cm, where as in 28mm a character would cover 18" in the same time frame. I suspect with the latter the game moves at a much greater pace. While that's a lot of ground to cover in a single phase the opposing player can interrupt by playing the card from an element that has not yet activated and fire (essentially bringing that element's action forward in the turn). It works in effect as an overwatch ability.

As appropriate for a game at this scale the junior leaders play an important role. This they do primarily by enhancing the actions available to an element by increasing the Action Points available to them in a given turn, thus enabling them to move faster or fire more often.

One major difference to Chain of Command is the emphasis put on spotting. Every time a unit tries to fire it must first spot the target. While I understand why a set of rules set at this scale might want to factor in the importance of spotting targets before firing we found these particular mechanics laborious and convoluted. If an element of riflemen (five characters) wishes to fire at a target players must roll for each individual character to see if they spot the target (spotting costs 1AP). A character that successfully spots a target may spend an additional AP to assist another character with their spotting by adding a positive modifier to the spotting roll. Characters can spend multiple APs trying to spot. This can involve a lot of dice rolling. Far too much in my opinion and not in any way that adds to the game experience. 
I'm just not sure it's worth all the effort, especially as the player knows where the enemy unit is located. If I know a field is covered by an enemy LMG team I'm not going to move into that field regardless of the success of my spotting roll. I may not be able to have my miniatures spot it and suppress it, but as the player I won't pretend it's not there. In a worse case scenario a player could make two spotting rolls for each character and if none are successful then their third and last AP might be used for something else (no point making that third spotting roll as by then you've run out of AP to fire). So it's quite possible to make ten separate spotting rolls for a five man rifle team, all unsuccessful, to then discover you can't do what you wanted in the turn. If you consider that all this is for one rifle team of five men, then imagine how many spotting rolls you might make in a turn for a major firefight between several squads?

I have no issue with the concept of a target being difficult to locate, but as the player/commander where should my focus of attention be? If my element/unit is unlikely to cause damage or suppress a target then I need to react tactically to resolve it. If I'm trying to think like a platoon leader then a simple and speedy resolution of this spotting/targeting issue would keep my attention focussed on the tactical issue rather than engaging in multiple spotting rolls.

Once a target is spotted a character may fire at it. All actions are resolved using a D20 and require the player to roll less than a specified number to be successful. As you might expect, various positive and negative modifiers apply depending on cover and types of weapon. 

This then brought us to another issue which we found unnecessarily complex and that was the number of possible outcomes from firing. There seemed a slightly bewildering number of these. At best an opponent's character will become combat ineffective (removed from the game). A weapon capable of suppressive fire (like an MG42 or semi automatic rifle) will make the unit suppressed (for which a morale check is required to remove). Some fire results will add Morale chits to the target (again requiring a morale check to remove, but not having the same effect as being suppressed). Units can also become Hesitant or Pinned. Often they can have a combination of some or all of these.

When taken individually each of these results make perfect sense and represent various degrees of discomfit a unit may suffer from incoming fire. However it makes for a lot of game mechanics and it's hard not to think that the rules writers could have found a way to abstract these to some degree and stream line them to achieve the outcome they want. 'Design for effect' to use a well worn gaming term. 

How did this impact our game? Well the simple scenario unfolded as one might expect. The Americans approached the objective using a combination of fire and movement while the Germans tried to use their LMGs to hold up their advance. Despite taking casualties and losing two NCOs the Americans successfully cleared the buildings and won the day. That said, for a game that represented a relatively simple action it took several hours to play and it never felt like it depicted the 'frenetic close-ranged combat' that it claims to do.

I understand what the rules writers are trying to simulate here but it can make for a dull experience. Admittedly this was our first game, nonetheless I think it was the flattest atmosphere I've experienced when playing Dave. It wasn't so much that we were bogged down in trying to understand the rules, it was more that we were mired in the myriad mechanics. Playability suffered and the added detail didn't make for a more enjoyable game. I can only imagine playing the same scenario using a set of rules like Chain of Command would deliver a shorter, more intense experience and result in an equally plausible historical outcome.

While it seems harsh to judge a set of rules on a single playing the experience was so underwhelming both Dave and I concluded that these were not a set of rules we would be in any hurry to return to in the near future.


Tuesday, 28 July 2020

Farewell Advanced Squad Leader

Advanced Squad Leader (ASL) purports to be a game about tactical leadership in combat in WWII. It comes from a long and noble line of hex and counter wargames from the Avalon Hill Game Company, with genetic roots in games such as Panzerblitz, Panzer Leader and Tobruk. Each of those games strived to improve on the ideas and game mechanics of its predecessor to develop a game that produced a better model of tactical combat in the Second World War. 


The IGO-UGO nature of Panzerblitz meant one side could dash armoured units across open ground from one piece of cover to another in the face of the enemy without that enemy having a chance to fire. That was rightly considered ‘unrealistic’ and not representative of combat in the period. In response Panzer Leader introduced the concept of opportunity fire, which in turn ASL further refined into the concept of defensive fire. These changes and evolutions didn’t necessarily make any of these a better ‘game’. Panzerblitz remains a challenging and rewarding tactical game. What these developments in game mechanics did try to achieve was an improved wargame - in other words, one that did an improved job of modelling some of the tactical aspects of the Second World War. The introduction of an opportunity fire rule in Panzer Leader had made those events taking place on the board feel more historically plausible.

I played all of those games, but none as much as I played Advanced Squad Leader. It became a game that dominated my gaming time for more than fifteen years. I won two of the Australian national tournaments at Cancon in Canberra (1993 and 2007). Here I am (on the right) playing the final in 2007 and receiving my trophy.


I also designed several scenarios, two of which J34 Men of the Mountains and J35 Siam Sambal were published in ASL Journal 2.


More recently I was trying to design new ASL scenarios set in Normandy and was immersed in reading about the actions there, trying to work up ideas. I was very interested in company and platoon level actions and particularly focussed on the command dilemmas faced by junior commanders. That brought me to a damascene moment where I realised that ASL had a number of inherent flaws that made it impossible for me to recreate the actions I was reading about using the ASL rule system. 

At first this didn't make sense to me. Here I was playing a game considered by many to be the ultimate Second World War tactical game, one that the publisher MMP claims has a set of rules that "..allow you to simulate practically any tactical-level engagement of World War II". Yet I was unable to replicate historical events I was reading about. 

That was a turning point. ASL remained an immersive and challenging tactical game, but it was apparent that this wasn't a game that did a good job of modelling certain critical aspects of tactical combat in the Second World War. Last year, as my ASL material drifted deeper and deeper into storage, I realised I would probably never play it again and sold it all. So, why?

To my mind ASL isn’t just a ‘game’. It’s designed to be a wargame and very specifically one that reflects tactical combat during the Second World War. It is called squad leader for a reason. So we are entitled to ask, what does it show us about the command issues of squad combat in WWII?

Let’s not be mistaken, ASL does not attempt to be a game that exists in its own universe. I challenge anyone to find a single rule in the enormous ASL rule book that doesn’t attempt to reflect a ‘real world’ situation. We see rules that make a stone building better protection than a wooden one; we see that a unit moves more slowly through woods than in open ground; we see a jeep moves fast along a road while a tank risks bogging down in muddy terrain. ASL doesn’t inhabit a fantasy world, the rules indicate that we are trying to replicate events and military units that occurred in the real world. In fact the reference point for every single rule is the real world. However, try interjecting this thought into a discussion in an ASL forum and you will be mocked and derided for using the, ahem, ‘reality argument’. A bit weird.


In this game about leadership and command during WWII, the first major issue is the chapter in the rule book about command and control. There isn’t one. That chapter doesn’t exist.

Here is a game about leadership and yet in ASL there is no chain of command, no platoon structure, in fact no military unit structure at all. It’s astonishing that this key element in the way military forces are organised and operate is missing in its entirety. You could be forgiven for thinking that the Second World War was run by corporals and their squads, with no higher levels of organisation or command.

The leaders that do exist within ASL operate more as unassigned die roll modifiers, free to roam the battlefield at will. Meanwhile the overall commander, you, is everywhere, magically issuing orders and assigning those leaders to whatever task pleases you. And those orders never go astray, never get misinterpreted and are always acted upon. In fact the only thing that prevents an order being executed exactly as you wish, when you wish, barring a few rare instances, is if the unit is fired upon and fails a morale check. 

This assumes that the only thing that impacts battlefield performance is morale, as long as morale is good a unit can be relied upon to operate with almost robotic certainty. For all its emphasis on the technical details of weapon systems the rules manage to distil all human activity down to the determination of a solitary factor - morale. In essence the machines are the main focus of attention, far more than the soldiers that operate them and the commanders that lead them. That was certainly the dominant focus in game design in the 70s and 80s and it is where ASL shows its age. 

Yet, if morale is such a critical component of game design how is it that a unit can suffer 40-50% casualties without any impact whatsoever on their overall morale? In fact ASL can be played right down to the bitter end with the last surviving half squad clinging on to the victory location to win. Not an unusual occurrence and something celebrated by players as a nail-biting game that came right down to the wire, evidence of how great the game is and how ‘well balanced’ the scenario. 

If the rules allow for ahistorical military formations (well, actually, no military formations at all) and for ahistorical command and control mechanisms, it shouldn't be too surprising to see ahistorical tactics applied in the game. And so it is.


The rigid phase system means that combat unfolds in an orderly and predictable fashion. And more fool you if you haven’t mastered that sequence of play - forgot to fire smoke first? tut tut, too late to do it now. Many of the best players I know are mathematicians, engineers, actuaries and systems analysts, and it’s no wonder, the game rewards calculation. I know my squad can move x many hexes each turn, therefore I know they will arrive at a certain destination at a specific time and so, like a complex piece of choreography I plan my turns.

Only the enemy can interfere with my plan and only during specific phases of play. There will be no other surprises. As fog of war barely exists in ASL this normally means I know exactly where my enemy is and therefore I can move with impunity in certain areas of the battlefield without concern. Not only that, I can move with absolute predictability through terrain my units have never even seen before - every pile of rubble is just as difficult to walk across; as is every patch of woodland, every stream. No unit arrives at their planned destination any later or earlier than expected. If you’ve counted the hexes and planned the move your unit will arrive with impeccable timing at their destination. The only possible impediment to this utterly predictable movement is failure of a morale check should the enemy fire at you.

This is one reason ASL players spend a lot of time counting hexes and believe me, counting hexes is a big part of playing ASL. It's one feature that makes it much more about the game than about the history. Platoon and company commanders spend most of their time trying to deal with the unknown and manage men in the confusion of combat, but in ASL you spend your time calculating what is needed to deal with the known. 

If this quote from the recollections of tank commander David Rinder is any indication of what combat is like, then ASL is wide of the mark. 

“The frictions of war – chance, bad weather, mistakes and ill fortune – are the only certainties of combat, along with death, injury and destruction........war is a random and bloody business, where the weird geometry of chance has its play and its frictions and human fallibility and fragility abound. Combat is fast moving, confusing and often bewildering. There is no perfect science, only perfect intent that is unlikely to withstand first contact with the prevailing realities on the ground once battle is joined, and the enemy also gets a vote in the outcome."

And if ASL is not about the history then why the pretence? We have Chapter H and its detailed listing of vehicles and guns; every ASL scenario is set in an historical setting with references to specific units in specific locations at specific dates, and if nothing else, there are a series of self-styled 'historical' modules set in places like Stalingrad. 


Yet, despite this facade of historical accuracy, the basic structure of infantry platoons and companies is absent. Take the Japanese infantry platoon for example. For most of the war it was a four squad platoon, with three rifle squads and a grenade discharger squad (the 50mm 'knee mortar'), with three grenade dischargers concentrated in the single squad. They were not parcelled out to other squads, it was doctrine to concentrate them. You wouldn't know or learn this from playing ASL.

It's strikes me as very ironic that the ASL community will argue vociferously that it's just a 'game' whenever anyone tries to trigger a discussion around how well the rules replicate the period and yet that's exactly what they do. ASL may appear to be about the Second World War, but in reality it's all about playing ASL. At times it does feel ASL exists in its own universe, a fictional, alternative Second World War that only exists in reference to the ASL rules, not to any other external reference.

The ASL rules writers tell players to focus on 'COWTRA' - concentrate on what the rules allow. The rule book being the ultimate reference point and arbiter. It's quite a contrast to a different set of rules for a similar level of combat in the Second World War that states "From time to time, situations will arise which are not covered in the rules. When this happens, consider what is and isn’t possible in real life in the relevant span of time. Discuss the situation with your opponent and come to an amicable agreement". Many ASL players reading this will find that statement utterly laughable.

So while the ASL rule book dedicates pages to the minutiae of Panji sticks or the slope of a beach for a beach landing it virtually ignores other far more critical aspects of combat during the period, not least of which are the mechanics of command and control. To me that’s a major flaw in a game that has the words ‘squad leader’ in its title. 

It’s a wonderfully challenging two player tactical game, don't misunderstand me, but not one about combat in the Second World War. I enjoyed it back in the day, but I won't miss it.


Monday, 18 May 2020

Undaunted: Normandy - a review

I don't normally do this, but with more time on my hands than usual I thought I'd write up my thoughts on the Osprey game Undaunted: Normandy, a two player, platoon level World War Two wargame.


This is a low level, skirmish style game where each player commands a platoon of either American or German infantry fighting in Normandy. The clearly written rules take up barely a few pages and are both quick to learn and easy to teach. However that's not to say it is simple, those straightforward rules underpin a game with a fair degree of nuance.

What makes it so novel and interesting is the combination of a fairly traditional counter and map game environment with a card driven mechanism which relies on careful deck building. I was intrigued by the concept, although I wasn't sure how well those mechanisms would work representing this level of warfare.

The game contains twelve scenarios, which can be played individually or put together to form a campaign. There are eighteen full colour tiles that are printed on both sides and these form the terrain pieces that make up the play area. There are sets of round counters which will be used on the map to represent the units for each side and a deck of cards that will drive the action of those counters. The scenarios define the configuration of the tiles, the available units, the initial placement of counters and objectives for both sides.


Each platoon is made up of three squads. The squads have three teams - 'Scouts', 'Riflemen' and 'Machine gunners', all led by a Squad Leader. The teams are represented by individual counters but the mechanism that is used to drive them is a deck of cards.

What is interesting is that the counters on the map do not represent a fixed number of men, it will be up to you to decide whether to call men forward as the tactical situation develops. Below is a picture of the counters and map tiles of a game in progress.

The binocular counters represent a tile that has been 'scouted' by their respective side (other than Scouts, a squad's counters cannot enter a tile if it has not been previously scouted). The brown, numbered flags indicate victory points awarded for control of that tile (as defined by the scenario).


While the teams are represented by counters on the map, the real interface that the player has with these units is through the deck of cards. Each platoon has a deck and each squad is represented by a squad leader card, three Scout cards, five Riflemen cards and three Machine gunner cards. These cards are both a command and control mechanism and a way of reflecting the relative strength of each team.

I was a little bit disappointed to see that both the German and American squads were basically the same and showed no national difference in structure or equipment. This is particularly notable given this is the Americans and the Germans, as I presume the German machine gun team are equipped with an MG34 or MG42, while the American team has a BAR. Distinctly different weapons and it would be good to have explored what differences they create. That said, there's absolutely no reason why later variations of the game could not do that, or alternatively players create their own. It's a small quibble but something that could have added rather nice historical chrome.

Below are the cards for the respective members of US squad 'A' (each platoon's squads are noted by either A, B or C).


The platoon also includes a Platoon Sergeant, a Platoon Guide and additional support units such as a light mortar team and a sniper (each scenario will define what if any of these are available). You will see that the bottom portion of each card lists a number of actions, the controlling player chooses which one of these to undertake when they play that card. The actual actions themselves are performed by the counter on the map, but they are driven by the play of the cards. These actions are all described in more detail on a one page quick reference sheet, but to be honest there are not many and after a few games you will find you don't need to refer to it.


The game also features 'Fog of War' cards. Essentially these are of no use, the more you have in your hand during a turn the less you will be able to do. Weeding those cards out of your deck but adding them to your opponent's is one of the roles of the Scouts. It's a nice little mechanism for abstracting the limited intelligence available to each commander.

The chosen scenario will tell you which of these teams is represented by a counter on the map and which of those cards will start in your deck (your available cards) and how many will be in supply. Supply represents those men who are not yet committed to the fight and await deployment onto the map. How and when that happens will be very much up to each player.


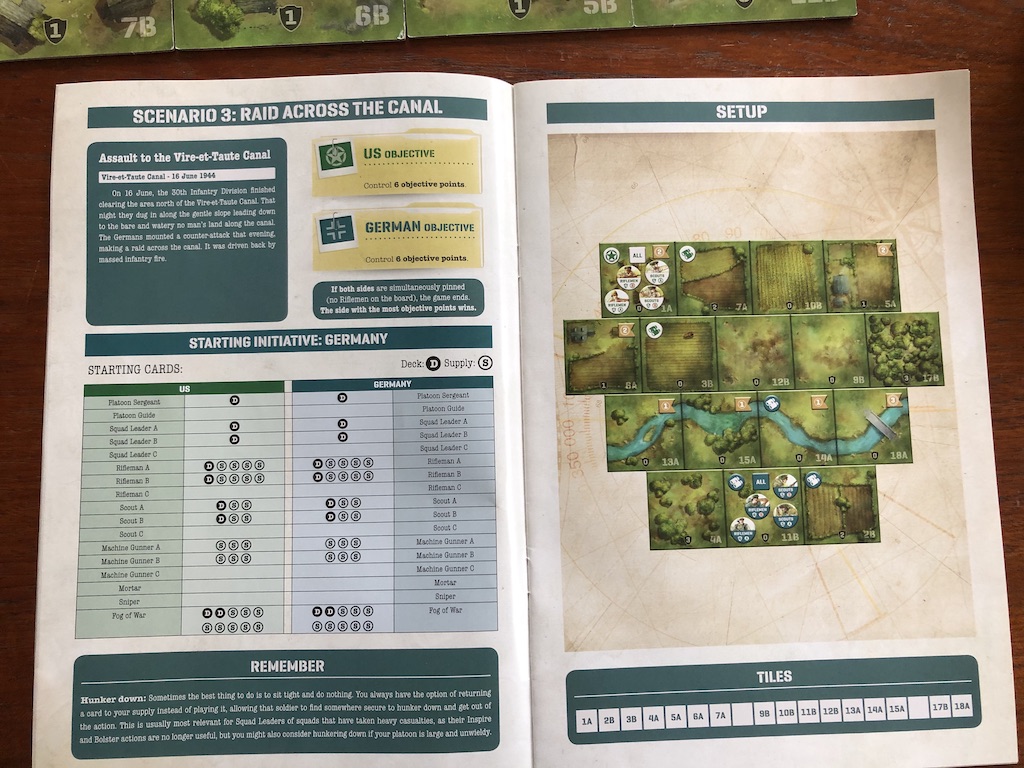
In the picture above from one of the scenario sheets, you will see that in the list for the starting cards some cards are marked with a D and others with an S. Those marked with a D will start in the player's deck, those marked S in supply. For this scenario the US player will not have available the platoon guide, squad C, the mortar team or the sniper. What you can see is that the US player's starting deck includes the platoon sergeant and both squad leaders, but only one rifleman and one scout from each squad and none of the machine gunners. It will be up to the player to decide when and how to use the sergeant and squad leaders to bring those riflemen, scout and machine gunner cards out of supply (in effect to call men forward) and into the deck. The deck is the pile of cards from which you will draw a hand of four cards with which to play out each turn (more on that in a minute).

This was about the only issue I have with the rules and it's a minor one but it's important to understand that cards can be in one of three places. This can be a little confusing at first.

Your hand describes the four cards you draw at the start of every turn. The deck describes the pile of available cards from which you can draw your handSupply describes those cards that are available for the scenario but are not yet in the deck.

If we use the example of those Machine Gunner teams for US squads A and B in the scenario sheet above. All are marked S, which means none of them will start in the deck for the US player, they are all in supply. The counters representing those Machine Gun teams are also off the map. They will only be placed at a later point in the game if the US player decides to deploy them and to do that he will need to add the machine gunner cards to his deck from supply before that can happen.

So a game begins with the map tiles configured according to the scenario sheet and with the relevant counters placed on the map. The cards that start in your deck are placed face down. The cards in supply are placed face up on one side of the playing area.


This brings us to the key driver of the game. Each turn both players draw four cards from the top of their deck. As these cards are face down neither player knows what has been drawn and they are kept secret from the opponent. Initiative for each turn is decided via a secret bid using one of those cards. Once initiative is determined the cards used to make the bid will join the player's discard pile, leaving each player with three cards for the turn.

The bid for initiative at the start of each turn offers the first dilemma, how much do you want initiative and what are you prepared to trade off to have it? The more useful the card the higher its bid value. You can bid with a Fog of War card, but with a bid value of 1, chances are you simply remove it from your hand rather than gain initiative.

The remaining three cards left in your hand will be used during the current player turn. The initiative player selects a card and plays it face up, carrying out one of the actions available to that type of card. With only three cards (and the chance one or more may be a useless Fog of War card), turns are brief and so the game flows quickly with little down time for either player.

The Scout, Rifleman and Machine Gunner cards will be used to activate their respective counters on the board. The squad leaders and the platoon sergeant carry out more abstract functions such as to call forth more men to their units (Bolster), to inspire (allow a card just played to be used again) or, in the case of the platoon sergeant, add two cards to your hand which can be used immediately (Command).


This limited number of cards introduces both friction, fog of war and a limited ability to perform actions. Much like the command dice in Chain of Command, each turn (or phase) a player must decide how best to use the limited command options available. By using a deck building mechanism Undaunted: Normandy allows you to try to control what some of those outcomes might be. How so? Knowing you will only have three cards to use per turn it's important that you keep your deck refined down to the key units you want to use at any given time, you also want to weed out the Fog of War cards (and ideally try to seed your opponent's deck with as many of these as you can).

How and when you add cards from supply into the deck is the key deck-building element of the game and a major component of command and control. A small deck that contains only the key cards for the activity you want to carry out in the upcoming turns will allow those cards to appear in your hand with greater frequency. For example early in a scenario you may want to push your Scouts forward to reconnoitre tiles, but once they've done that, you may then want to put the emphasis on your machine gun teams laying down suppressive fire, in which case you won't want a lot of Scout cards appearing in your hand when you no longer have a need for them. Time to have those men take cover somewhere by having them Hunker Down (returning the card to supply).

If you look at the example with the US machine gun teams that start the scenario in supply, if you decide that you don't need those teams right now, then there's no point adding those cards to the deck just yet. On the other hand if you can foresee a time in the near future when you might need them then you might want to start the process of adding them sooner rather than later. The reverse also applies and players can choose to Hunker Down, which returns a card to supply.

I like the narrative this sets up. The squad leader or platoon sergeant has identified an issue on the battlefield and needs the LMG team to move up and come into action. In effect he needs to go back himself or send a runner to make that happen. How and when they actually turn up is a little bit fluid and that adds a sense of battlefield friction to proceedings. In a similar way if you have too many cards in your deck, you have stretched the command structure beyond its ability to function at its most effective. Better to have squads A and B leading the action and keep C in reserve to be called up when needed than try to overstretch your command ability.

That is the traditional challenge of deck building games, how well that represents the challenge of command at platoon level is another matter. In one sense you can justify it as the extent to which a commander can focus his attention, but then we know that units can and will operate under their own initiative or simply continue following their orders even without the presence of their commander. This is where Undaunted: Normandy becomes more of a game than a wargame. Given I see this as a lighter, filler game I'm more than happy to accept this as a compromise to keep the game simple and playable. I think you can justify it as a simplified mechanism to reflect the need for the commander to stay focussed on the mission and the resources needed to have it completed.

The mechanics for movement and firing are very straightforward. Let's say the US player plays one of the cards for Rifleman A. The card offers three choices:


Move (1) - this allows a movement of one tile.

Attack (1) - this allows the unit to fire rolling one fire dice.

Control - this allows the counter to take control of the tile it currently occupies (often the key to scenario victory).

A Move is very straightforward. As long as the tile has been scouted by his side the counter may move one tile. There are no terrain restrictions to movement, it's basically an area move into a new location.

Attack allows the counter to fire. There are no line of sight restrictions (a bit odd, I know), the counter may nominate any enemy counter on the map and fire at it. In the rifleman's case you roll one D10. Each counter has a defence number (4 in the case of Riflemen). This is added to the defence value of the tile the target occupies (a number between 0 and 3 that is printed on each map tile). Finally the number of tiles from the firer to the target is added to this total (while nothing blocks line of sight completely, this range in tiles goes some way to suggesting hinderances between firer and target). So let's say we want to fire at an enemy Riflemen counter in defence terrain of value 2 that is three tiles away. That gives us the sum of 4 (the Riflemen's inherent defence value) + 2 (the terrain defence value of the target tile) + 3 (the range in tiles) = 9. In order to score a 'hit' the firer needs to roll 9 or more on a D10.

A hit represents a man out of action and requires the defending player to permanently remove a corresponding Rifleman card (for the relevant squad). This is where the distinction between hand, deck and supply is important. In the first instance the card must come from the current hand, so if you are the non-initiative player you could potentially lose a card you were intending to play in your turn. One good reason to hold the initiative and act first. If there is no card in your hand, or you have already had you turn, then remove one from the discard pile. If there is no card there remove it from your deck. If there is no corresponding card in any of these three then the player must remove the counter from the board (in other words all the men it represented have been lost as casualties). If there is a corresponding card in supply, this is not removed (as the soldier had not deployed and so wasn't in the line of fire). 

Any cards in supply can be added to your deck (using a leader's Bolster action) and when played from your hand you can return the counter to the map (but back at an initial deployment point, not to the tile from which it was removed). In other words if all the men you have in action (the cards you have in your deck) are casualties (you have no card available in your deck), then the team is no longer on the map. Of course if you have some of those cards in supply you can call those men forward to form the team, but as they are coming from the rear that's where they are going to start.

Once again this is where the deck building element becomes important. If you have a single Rifleman from squad A in your deck then the only time you will be able to activate the counter for that team is when that card cycles back into your hand for a given turn. Having the cards for all five Riflemen from squad A in your deck make that occurence much more likely. It also makes that counter much more resilient to combat casualties.


If you look at the Machine Gunner card above you will see that it has Attack (2), in other words it will roll 2D10 when it fires, so as you might expect it can be a more effective weapon. Alternatively it has the action Suppress (4). This is unique to machine guns and means the firer rolls 4D10 and any hit suppresses the target. In this instances no cards are removed for the hit, instead the target counter is flipped over to its reverse side. It can take no further action until the controlling player plays a corresponding card. This returns the counter to normal but allows no further action for that card play.

A suppressed unit is a good example of where the squad leader cards come into their own. Let's say you have a suppressed riflemen counter and in your hand for this turn you have one of the corresponding rifleman cards; the squad leader card for that squad, and a fog of war card. You could play the rifleman card first and this would return the suppressed counter to normal. By then playing the squad leader card and choosing the Inspire action you can immediately return the rifleman card to your hand. Now that the counter is no longer suppressed you can then play the rifleman card again but this time choose to use one of the actions like Move or Attack. The Fog of War card is of course useless and goes to the discard pile, so ending the player's turn.

Incidentally the discard pile is also the place where a card is put when it is moved from supply to your deck. Only when you can no longer draw four cards from your deck at the start of each turn do you shuffle the discard pile to become your new deck. The bigger your deck the longer it will take to work through it and the longer it will take a card brought from supply to the discard pile to make its way into your hand.

It only takes one game to get a decent handle on the rules and mechanics, but it takes several more to really get to grips with how to play it well. I think the classic line 'easy to learn, hard to master' probably applies. I've also found it plays very well solo. I don't use any special rules, I simply played each side to the best of my ability. The random nature of the card play makes this very easy to do.

Undaunted: Normandy is a nice twist on a number of game concepts and mechanics and I think it succeeds at what it sets out to do. With most scenarios playing out in about 45-60 minutes it also makes the perfect game when you don't want to take up a whole evening or afternoon. I like it far more than I expected I would.