
No, not the museum of the year, but looking back on a year filled with museum visits. One of the joys of visiting a military museum is seeing the actual historical objects that I model and paint in miniature. Over the last twelve months I've managed to see a lot more than usual. So, instead of a review of the year's gaming, I thought I'd wrap up 2024 with a few highlights from those visits.
It had been a few years since I last visited both the Imperial War Museum (IWM) and the National Army Museum (NAM) in London and quite a bit has changed in that time. The expansion of the galleries at the IWM meant there was a lot more to see and much that I hadn't seen before.
While I took hundreds of photographs I've chosen to focus on a few subjects that are related to more recent projects from my gaming.
The Imperial War Museum has always featured a very good collection of material from the Great War and it was a fitting start to see the German stormtrooper equipment.

The Great War Miniatures 28mm stormtroopers are a lovely set of figures and I think I've done the uniform and equipment justice. I started off 2024 running participation games where these featured in a late war scenario using the Great War variant for Chain of Command.

The central hall of the museum features a quick firing 13 pounder gun and limber, an iconic piece of British equipment from the same war.


The model saw action in the same participation games that I ran at CanCon in Canberra.

Staying with the Great War, the museum has a cabinet featuring three items of essential British kit - a Lee Enfield rifle, a Lewis Gun and a rifle grenade cup for a Lee Enfield. The rifle and Lewis I've seen before in other museums but not the grenade cup.


Moving ahead to the Second World War, it was great to see a US Marine uniform, not least because putting together a force for the marines was my first major painting project for 2024.

All the marines are from the 20mm Eureka Miniatures range, sculpted by Mike Broadbent (who sadly passed away this year).

From what I understand the uniform was prone to fade, so I've tried to capture some of that in my painting. I found Vallejo's model colour Green Grey a good base colour for these.

Staying with the war against the Japanese, the campaign in Burma has been a feature of our gaming this year. I put together a mini-campaign Bunker Busting on Nunshigum Ridge set during the battles around Imphal in 1944. This British uniform of jungle greens shows the shift away from khaki drill to more practical wear for jungle and tropical conditions.

I've been using miniatures from the AB Figures tropical British infantry range for this theatre and they fill that role well.


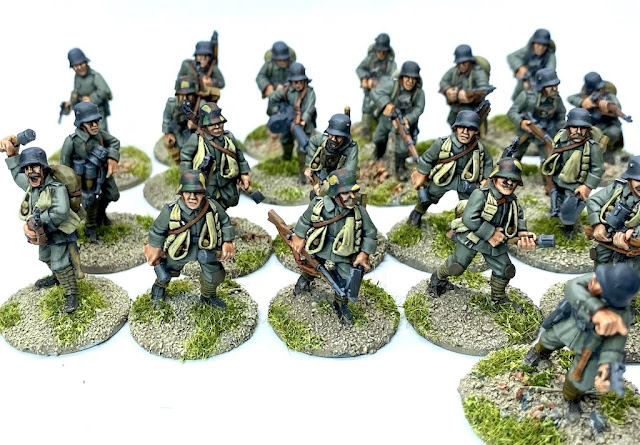
One of the painting challenges when putting together German units for the Second World War is dealing with their many camouflage schemes. Splinter camouflage is a common one and there's a good example on display.

Completing a platoon of Fallschirmjager for Chain of Command has been on my 'to do' list for some time. That was the second project completed in 2024. AB Figures were my first choice when putting together the platoon and I tried my hand at splinter camouflage for the first time. In the end it was far less daunting than I imagined and I was pleased with the end result.

Another iconic piece of equipment is the German panzerfaust.


The National Army Museum begins the story of the British army much earlier than the Great War. Unsurprisingly, there is much less on display for those periods as so little has survived when compared with the wars of the 20th century.
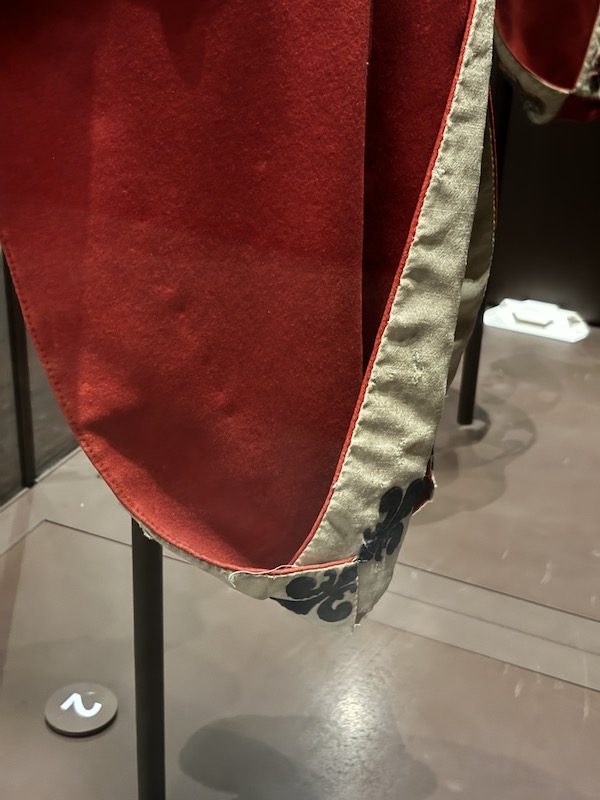
I particularly liked seeing a light infantry helmet from the 18th century, not least because of my interest in the American War of Independence.


The museum has more material from the 19th century and I was delighted to see several objects from the wars in the Sudan including this jibbeh and shield.


My British figures are also a mix of metal and plastic from the Perry range.

Moving forward to the 20th century and the Great War, the museum has a German Mauser automatic pistol on display.

Several of the Great War Miniatures' German officers are armed with these.

With the Second World War in Burma being a running theme for this year I loved this example of a Chindit bush hat. It's preserved in the state it was in when the wearer returned from an operation.
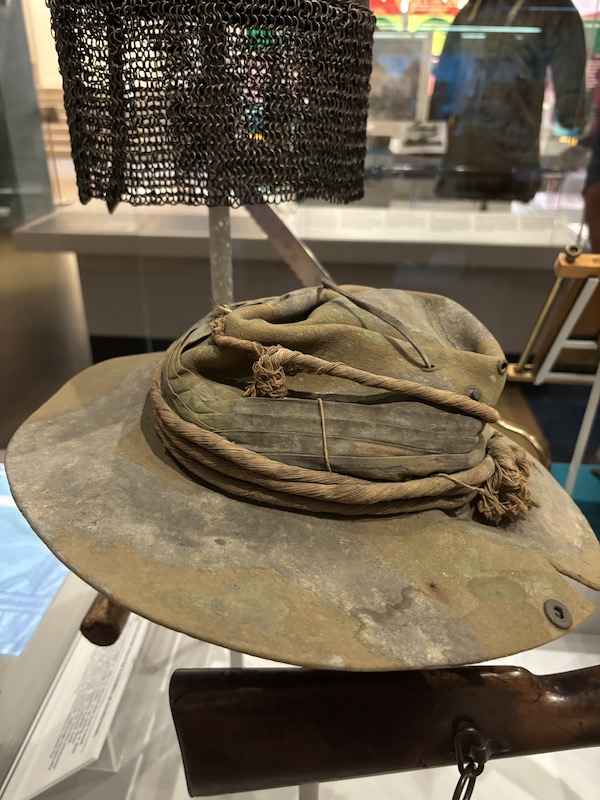
Quite a difference from the pristine bush hat on display in the IWM.


While I've seen several Japanese grenade dischargers (often referred to as a 'knee mortar') the British 2" mortar is something I haven't seen before. While there is not much to it and it's a simple device, it's always good to see these things in full scale to get a good idea of how big (or small) they really are.

All of my 2” mortar teams are prone figures, but I picked up a different set of figures at the Eureka stand at Cancon back in January of this year, including this team from AB Figures.

The museum brings us more up to date with this British uniform from the more recent war in Afghanistan.

The first 28mm figures I ever painted, when I returned to miniature gaming ten years ago, were for Afghanistan. These are from the Empress Miniatures range. I've tried a few rule sets for the period including Force on Force and Blacks Ops. We've yet to find the rule set that really works for us, although we do keep talking about revisiting Force on Force, something we might get around to in 2025.

Needless to say I took a lot more photographs at both museums, more than I could possibly feature here, and many will no doubt crop up in other blog posts over time.
A trip to Winchester took me to Peninsula Barracks where there are several regimental museums all within the same complex. I think the Green Jackets Museum was the highlight. There is much to see and, for anyone with an interest in miniatures, it features some wonderful dioramas.
At the entrance are two guns that had been captured from the Egyptian army by the Mahdists in the Sudan and recaptured in turn by the British Army at the Battle of Omdurman in 1898.


The museum features several items from the wars in Sudan, including a blood stained Mahdist jibbeh.


I made a simple conversion of one of those plastic figures to make a Mullah (who operates like a Holy Man in the Sharp Practice rules) and tried to give him a more distinctive look and dress.

Jumping ahead to the Second World War, a cabinet featured several examples of Japanese insignia and swords.


Last, but not least, as I was leaving I spotted this Taliban motorbike near the exit. It looked strangely familiar.

I thought it made a perfect match for this pair from Empress Miniatures.


The museum makes good use of models and dioramas to tell the regiment's story. I particularly liked the storming of the Kashmir gate during the India Mutiny using fairly large scale figures (I'm guessing they are about 60mm).


While dioramas tell one story the good use of miniatures on a wall mounted display to help explain Napoleonic formations was a rather clever use of smaller 10mm figures.


Before we leave the Green Jackets Museum it would be remiss of me not to mention the spectacular Waterloo diorama that features more than 25,000 figures. While I don't have a Napoleonic collection and it's not a period I game, the painter and gamer in me couldn't help but admire the effort that has gone into this.

The Gurkha Museum is also here, but the collection is not as extensive as the Green Jackets. It does a fine job of telling the story of the Gurkhas and what it lacks in historical objects it makes up for with dioramas and manequins.


The dioramas aside, there were several historical objects I found of interest in the museum, although many were examples of Japanese equipment that I've shown earlier. There was this Japanese helmet with rather grim signs that things did not end well for the last person wearing it.

The museum of the Kings Royal Hussars is also at Peninsula Barracks. They have an interesting collection of objects related to the wars in Sudan in the 19th century including more Mahdists shields and swords.


They also have a Daimler Dingo. While I've seen the Lynx, the Canadian version in the Canadian War Museum, I haven't seen British version. This one is in desert colours.

Mine, from S-Models with a crew from AB Figures, is painted for North West Europe (and it's also no longer on a base. I saw the error of my ways!).

Just outside the main barracks complex is the museum of the Royal Hampshire Regiment Museum. Like the IWM they also have a German First World War helmet in the distinctive camouflage scheme. The paint has faded over time but it's still clear to visualise how it might have once looked. I'm aware there is some controversy over these and how common they were. This is partly because they were popular as souvenirs after the war and fetched a higher price than the more plain grey helmets. There appears to be some evidence that there was an unscrupulous side of the souvenir business that was painting plain coloured helmets in this scheme after the war.

Once again here are more of my EWM stormtroopers, many wearing helmets with similar schemes.

While those figures were not painted in 2024, they were used to help me illustrate an article I wrote about using the Warlord Games Ruined Hamlet set to make terrain pieces. That appeared in the December 2024 issue of Wargames, Soldiers and Strategy Magazine (#133).

A mannequin of a British soldier kitted out for the front line and carrying barbed wire screw pickets caught my eye.

These were something I'd scratch built for myself when making lengths of wire for the First World War project and they were used in the participation games at Cancon back in January.

I've seen far more panzerfausts than I have the British PIAT, so it was good to see one of those and a projectile on display.

I think it goes without saying, I've painted several of these for my British units for the Second World War. Most recently for my late war force for Burma.

The following day I made my way down to the Tank Museum in Bovington. By the way, in case it isn't obvious, I have an almost insatiable appetite for military museums. Fortunately, I spared my family the agony of following me around. These two days I travelled alone and could indulge my interest at leisure.
So, Bovington, where to start? There is so much to see. I'll just focus on the few that were related to recent gaming interests and which caught my eye for that reason.
From the Great War a British Mark V male tank.

My only attempt at one of these for my gaming is a 28mm MDF version of the MkI from Warbases. It's a fairly basic kit and I made a few changes. I've tried to make it as generic as possible, so it is very much a game piece rather than an accurate model. The purists will also note that my paint scheme is wrong for the MkI. The red and white stripes were a feature of the late war, used to differentiate the British tanks from captured versions used by the Germans.

The FT17 is always of enduring interest as it established the key design concepts that have stayed with tanks to this day.


The Lanchester armoured car was an interwar vehicle that saw service in the Far East and other parts of the British empire. While obsolete by the start of the Second World War they continued to see active service in places like Malaya. This is one of those reasons I enjoy seeing things in museums, this really is a very large vehicle, bigger than many tanks of the interwar period.

My miniature version is a rather basic, almost crude, 20mm resin model I have for my Far East games. I can't recall the manufacturer and perhaps that's just as well. I'd really like to find something more refined, as the vehicle has the potential to look great on the table top.

On the subject of interwar armoured cars this Austin MkIV with its distinctive twin turrets was a recent subject for my Japanese force for the war in China.

In my case this was a plastic kit from Masterbox painted in khaki with Japanese markings that I made earlier in the year. In contrast to the model of the Lanchester, it's a timely reminder that injection moulded plastic kits have a quality all their own.

I particularly enjoyed seeing this Vickers 6 ton tank from the interwar period for one very specific reason....

It bore a strong resemblance to the paint scheme I used for the one I have in my collection for my Chinese force. This one a plastic 1/72 kit from UM.

It seems not many of the eight wheel German armoured cars have survived, so it was great to see this Sdkfz234/4.

I have an earlier variant, in this case a Sdkfz231 Schwerer Panzerspähwagen, a 1/72 kit from the Plastic Soldier Company.


I have a couple of these, although they are yet to feature in a game, both are kits from Pegasus.

There was so much more at Bovington it's hard to know where to finish. As usual I took hundreds of photographs, some of which will no doubt appear in future posts.
A trip to Paris later in the year called for a visit to the Musee de l'Armée. This museum is to uniforms what Bovington is to tanks. Although, having already confessed to not collecting or gaming the Napoleonic period, some of you may wonder what the appeal may have been! Firstly, while there is much to see from that period it remains only one part of an extensive collection. Secondly, my interest in the American War of Independence means I still have a strong interest in the horse and musket period, so there is still much to catch the eye despite changes to weaponry and uniforms.
Talking of the Americas there are several objects from the French and Indian Wars including this lovely example of a mocassin.

That's an item of footwear I've tried to replicate when painting these 28mm Perry native Americans for my AWI games.

There were several French uniforms from the 1780 period. Getting this close makes it possible to observe the smaller details in fabric quality, the workmanship of the tailoring and the detailing of buttons. While our painting rarely drills down to this level it was good to grasp a feel for how these all look.


All these sorts of details were common to most European armies and it's the sort of thing I've tried to replicate when painting figures like these Perry light dragoons.

I'll jump forward in time to the First World War, but that doesn't do justice to the way the museum covers the intervening period, with an excellent collection of uniforms and weapons from the Napoleonic era to the Franco Prussian War, as well as wars in the French empire of the 19th century. While I found all of interest, none of it relates to my gaming.
Unsurprisingly, the Great War features prominently and, quite naturally, with a lot of emphasis on the French. At this stage I don't have any French units so my attention was drawn to a few of the German objects on display, including this Krupp 75mm gun.

That's one of the supports for my 28mm Great War collection and once again it's a gun and crew from the Great War Miniatures range.

A Grenatenwerfer also caught my eye.

That's another support for my German force from Great War Miniatures.

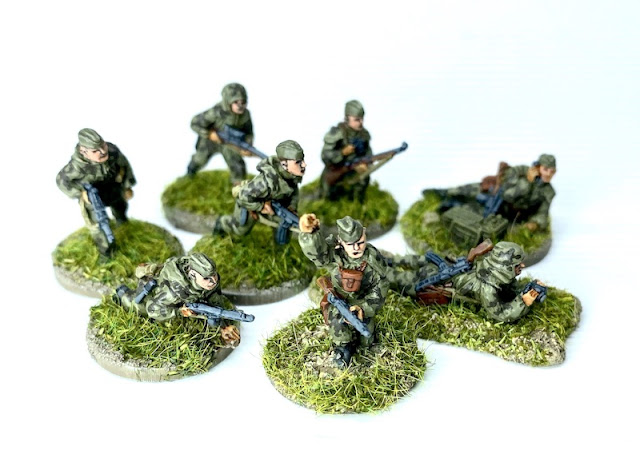
Moving ahead to the Second World War and, like the Imperial War Museum, there are several good examples of German camouflage uniforms. First up, a smock in one of the variations of the pea dot pattern.

Something I spent much time trying to replicate for my 20mm AB Figures Waffen SS platoon.

Another was this reversible camouflage parka.


That's an item of clothing I've tried to paint on a few of my AB Figures Volksgrenadiers.

Once again a Fallschirmjager smock in splinter camouflage makes an appearance.

I think my painting on these AB Figures Fallschirmjager holds up well. The paints I used were the Splittertarnmuster uniform set from AK Interactive and I think they do an excellent job of matching the colours on the real thing.

There is a good display of infantry anti-tank weapons including a bazooka and a panzerschreck. I can't recall seeing a panzerschreck before, so this was a first for me.

I've painted quite a few of these over the years, here are two teams from the AB Figures Waffen SS range.

As for the bazooka, these are the most recent to be added to the collection. In this case for my US Marines, with figures from the 20mm Eureka Miniatures range.

Staying with the Americans, there was a tripod mounted 50cal machine gun. I have seen these in other configurations, normally mounted on vehicles, but it was good to see it here in its most simplest form. Having seen other tripod mounted machine guns like the Vickers and MG42 it easy to see how much bigger the 50cal is by comparison. It's a fearsome looking weapon.

The only tripod mounted version I have for my gaming is this one from AB Figures for my ETO theatre Americans.

The displays covering D-Day includes this British airborne Denison smock.

I painted my AB Figures paratroops back when I was still using the Army Painter dip method. I was afraid it might make the smocks appear too dark and so I painted the base colour in a fairly light shade when I now think that something closer to the AK Interactive base colour that I used for the Fallschirmjager may have worked best.

Among the more unusual uniforms was this Russian amoeba suit, worn by scouts and snipers.

AB Figures produce a lovely set of scouts wearing the suits, although in this photo is quite hard to see my attempt to paint the amoeba pattern given the pose of the figures.
American small arms are grouped together in a display. None of them particularly rare, but all the subject of some of my painting in 2024.


I feel as though I've barely touched on all there was to see in the various museums and yet this has turned into a very long post. If you've stayed with me this long, thank you, I hope you found it interesting. Most of the colour sources for my figure painting come from either Osprey or similar books which tend to feature paintings. Other sources include contemporary photographs but they are rarely in colour, so having the opportunity to see these weapons and uniforms in person is something I always value, making 2024 a particularly fruitful year in that respect.