
I was really pleased when the much awaited Far East Hanbook for Chain of Command was published earlier this year. While the handbook gives us a very comprehensive set of rules and army lists for the theatre there had been an earlier variant which was published as part of the Malaya 1942 pint sized campaign in the TFL Christmas Special 2015.

One of the things that struck me about the new handbook was the treatment of Japanese fortifications. As they did historically, eliminating these calls for innovation and new tactics. That led me to put together a short campaign to put those fortifications to the test and see how they could be dealt with in the course of a game. This was based on reading several accounts of the action on Nunshigum Ridge during the battle for Imphal in 1944. Suitably entitled Bunker Busting on Nunshigum Ridge I've reported all of our games here on the blog and if you haven't followed them already you can find them here.

I created models of various bunkers with this and other campaigns in mind and you can follow that process in this post.


As you can see I decided to create them to appear on the table as they may have in real life - sunk into the ground and barely noticeable. That's meant there was no way to put figures inside. In order to track what's happening to the occupants during a game I've come up with a 'holding box' for the figures that I can keep to the side of the table.

I've made it quite a visual piece as I intend using it for participation games I will be running at CanCon in Canberra in January 2025. I think it goes without saying that there is no reason why I shouldn't use it for all my games featuring Japanese fortifications of which I hope there will be many.
The holding box is a variation on the idea I came up with for my platoon boards. Using foamcore I cut out shapes to correspond to the bunkers for two Japanese squad prepared position LMG bunkers and for one Ambush bunker housing an MMG team.

I've represented the logs that would have been used to construct the bunker interior with bamboo BBQ skewers, the same skewers I used for the bunker apertures in the models that will appear on the table. I cut them using The Chopper, a very handy tool that has helped me with so many terrain projects.


For some time now I've been wondering what to do with several A4 sized pieces of model ground cover that I bought many years ago for my 1/35 scale models. Despite trying to find applications for them for gaming they are too small to really fit any project and the ground cover too different to blend in with my other basing material.


Finally I've found a use for some of it and in this situation I think it's very effective.
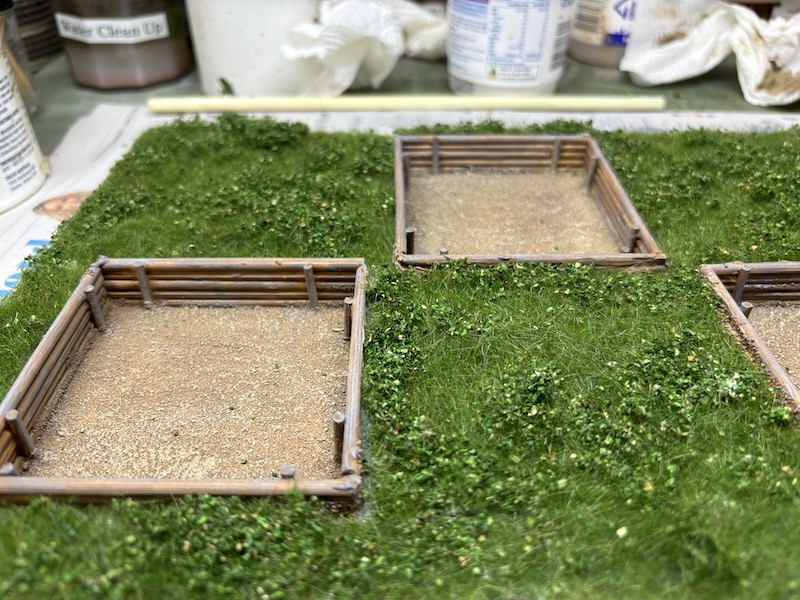
For the participation games I've used a cheap A4 picture frame as a holder and that's allowed me to add labels to clearly identify each bunker and match it to the one on the table.

A couple of spare palm trees were a finishing touch that I couldn't resist. They can be removed easily, as can the picture frame, so it all packs away without taking up too much space.


The FE Handbook continues the use of the Red command dice as a way of representing superior training or leadership in certain units that can be expected to perform above average. The units that have this option usually lose that extra dice at when their force morale drops to a certain level. In a similar way some units will have to start moving units back to their jump-off-points when their morale reaches a very low point. These are marked on the force's particular morale track with their order of battle. To help remind us when those levels are reached I've created a couple of simple markers to place on the force morale trackers so we won't forget when these levels are reached.


Here's how their force morale board appeared at the start of one of our games. They began with force morale at 10, that's marked by the rising sun symbol. The Red marker is in four and the J marker is in two. As the game progresses and if Japanese morale falls then the rising sun marker is moved to track it. Once it reaches the Red marker we know the dice is removed.

The return to playing in the Far East has been a good opportunity to bring out my terrain for that theatre. As always there are several extra pieces to make and a chance to refresh those that I have already. I'll be covering some of those in a future post.
Superb modelling all round, really like the bunkers and the "holding box" is a great idea to overcome your problem, top notch!
ReplyDeleteThank you!
DeleteBrilliant! Splendid ideas and inspiration all round.
ReplyDeleteThanks Phil, glad you liked them.
DeleteThe holding box is a beautifully executed idea, the chopper looks useful, angles to!
ReplyDeleteThe chopper is a very handy tool for terrain, it gets a lot of use.
DeleteAn interesting piece, what do you do if the loss of the red die and the move back to a JOP occur at the same morale level? Or, is that something specifically excluded in the rules?
ReplyDeleteI also like to think your bunker occupants holding board was inspired by my bulding templates indicating where and on what floor any occupants are. Of course you have taken it to a much higher level with your scenic depictions of the bunker interior.
Is there another campaign in the offing?
Not sure the two occur at the same time but no problem to stack one on top of the other. I must confess I had the concept for the holding box roughly sorted in my mind before I saw your templates but seeing them only confirmed in my mind this was the direction to go in as I thought they were a great idea for handling just this sort of situation. Great minds and all that!
DeleteWhat is 'The Chopper' and where can you get it? Amazon?
ReplyDeleteI bought it in the US about ten years ago from a model railway supplier. I can’t recall any names, it was a while ago but I’m sure a bit of a search online should throw something up.
DeleteVery useful and inspirational. Thanks!
ReplyDelete