

Following another defeat at the hands of Von Luck's panzer grenadiers the action shifts to Scenario 4 'The Church on the Flank'. The Paras can use a fresh platoon here, but they are restricted to three support points. However the terrain looks promising for the defender with the Germans having to cross a fair amount of open ground in front of a defensive position with several houses and stone walls. That said, the Germans do have a quite considerable 20 support points available to help them tackle the terrain and this could ease that task for them.

So far Dave has invariably called in a mortar barrage for support and looking at this terrain I would be very surprised if he doesn't do it again. At first glance the obvious place to defend is the church and surrounding graveyard and I'd estimate that's rather conveniently also about 18" square. If it were me, that's where the barrage would come down. That's one of several reason why I think it unwise to anchor a defence around the church. Firstly, the church building itself offers little for the defender. What few windows it has face north and south and the tower is such an open target I doubt anything would survive up there for long. Looking at the stone walls in front of the church, while they offer some good cover and allow the defender to sweep the open ground with fire, it is also very exposed to German return fire (and they can muster quite a lot of that).
Dave is too experienced a player to hastily rush across that open ground and I can be certain that when he does feel ready to do so, it will be only when he can bring a lot of fire down on any defender who dares show himself. I'm outgunned by the panzer grenadiers and my only chance is to try to pick him off in detail and not allow him to bring that overwhelming firepower to bear. For those reasons I'm going to avoid the obvious and not defend within the church grounds.

So here is my thinking, I will look to cover the open ground from both flanks. Both points 1 and 2 are not open to his entire front, which should mean it will be hard for him to bring the fire of several units to bear on units in either of these locations. However, I'm not convinced the open ground will be a killing ground. I think the graveyard in the church grounds could be the place - it only provides light cover to anyone moving across it and yet allows the Paras to take up positions on several sides, behind the walls or in the upper levels of buildings, and hit an attacker from several sides.
Force Morale saw British start at eleven and the Germans at ten, so once again the Paras have the initiative.
With my gut feeling that Dave will put a mortar barrage on the church and then advance up behind it, this becomes my preferred plan of defence and I will look to place my JoPs accordingly. As for support, I have two entrenchments at no cost as part of the campaign. I will add another two entrenchments and my final support point goes on an Adjutant, as I may need both Senior Leaders on the table if my defence is to be as flexible as possible.
As nothing in life is certain and just in case I've got Dave's intentions all wrong, I decided to place one jump-off-point in the church, just to ensure I could respond if things played out differently.

The Germans have far fewer options for the placement of their jump-off-points, so no surprise they have them in the sunken lane and behind the hedgerows. So with that done, we started. With initiative I take the first command roll and while my plan is to deploy once he is much closer, I'm hoping to build up some CoC dice while he is deploying and making those initial moves.
In the early rolls Dave slowly begins to deploy onto the table, while I roll a lot of 6s including one triple. I hoped perhaps he'd called on a Werfer barrage for support, but no such luck, so that triple six was wasted. I followed that roll with four 5s and a 6. It then looked like things were getting really out of hand when I rolled four 6s. The random event was the discovery of a wine stash, but with my Force Morale already at eleven, it made no difference. Crazy stuff. While this is all going on the Germans have begun to deploy in force.
As I thought, Dave has deployed carefully and ready to cover any forward move with a lot of firepower. At this range there is no need to reveal myself, so I hang fire and hope some of those double phases and turn end command rolls come back later in the game.

So far this is pretty much how I was expecting things to unfold - cautious German advance combining overwatch with tactical movement. It then comes as no surprise to see a forward observer turn up behind the hedges. No unpleasant surprises so far.
With the Germans edging forward I decide I need to deploy some sort of threat, just to keep them cautious, so I deploy a sniper into the church tower (yes, it's an obvious location, but he can snipe away looking for leaders to hit). He manages to inflict a casualty and some shock on the squad on the German left flank. I have a hunch this deployment has led Dave to believe my defence would be anchored on the church, because the German FO brings his ranging shot down in the graveyard.
With that I decide to deploy the platoon sergeant and the 2" mortar. I'm thinking that if I can isolate some of his sections and block some of the overwatch using smoke, then I can try to inflict casualties on any exposed units when he can't return too much fire.
I'm going to need this smoke to work some magic. As you can see, there's a lot of German fire ready to pour down on that churchyard.

The 2" mortar lays down some smoke that blocks the line of sight for the MMG and the FO. With that I deploy the entrenched Para support section and its two bren teams on my right, slightly behind the farmhouse. There is a German MG42 team that has detached itself carelessly from its section (a roll for a normal move of 11" saw it rush ahead) and that becomes my target.


The game is now coming to a critical point. We have both taken casualties, but with the Germans now in the churchyard and close to capturing a JoP I decide to use my remaining CoC dice to move that jump-off-point back, instead of ending the turn to try and eliminate the barrage. In hindsight that was a bad move, I think having the bren section back in action would have been well worth the risk of a drop in force morale. At that point it was time to deploy my final section for what I hope will be a decisive firefight in the churchyard.
With one Para section on the left side of the churchyard and the newly deployed one covering the centre I'm hoping I can stall the German advance. I have elite troops behind hard cover, he has regulars in light cover. He does have more firepower, but the odds are less in his favour. I deploy my senior leader at this point, so that he can help influence both sections and get maximum effort from all teams.
A furious firefight ensues, but the German firepower begins to tell and the Paras casualties mount disproportionately. Dave manages to roll a double phase at a critical moment. With the first phase he rolls 36 dice and gets three hits. I breath a sigh of relief. His next phase attack is far more devastating and the Para section on my left takes six casualties. To add insult to injury the leaders are really taking hits and that begins to drive down force morale. The Germans have taken a lot of casualties too, but they sense a last push here might just do it. A weakened German squad comes around one side of the church and rushes into close combat with the Para section in the centre. The Paras wipe out the Germans but in the process take a few casualties and a wounded leader and the Para force morale drops to three.
At this point the Paras are on the back foot. The the platoon lieutenant is a casualty; one section with the platoon sergeant are pinned under the barrage; another section has only two surviving men, and the other is without a leader. The options aren't great. What I have available is outgunned, outnumbered and is supported with more leaders. Sure, the Germans are weakened, but with leaders present and a force morale of seven they have many more options and it's clear which way this one has gone. Chalk up another defeat for the Paras. That said, it's been a close run thing. The Germans took nineteen casualties (fourteen from the platoon and five from supports) while the Paras took seventeen, so despite the loss, the Paras have managed to dish out punishment to yet another German platoon.
It's most likely too little, too late for this campaign. Much will depend on the outcome of the next scenario. The Germans have two attempts at that scenario for campaign victory. I have a fresh platoon I can bring on and the Germans have enough men to create one full platoon. To go the distance I need to win the next scenario and inflict significant loss on the Germans without taking too much myself.
The British finish with the CO's opinion at -5 (that will be one less support next game); the Men's Opinion at -7 (that's -2 to the FM roll) and the Platoon commander's outlook as Sad (I'm not surprised).
The German CO is impressed and his opinion is at +3, the men a little less given the increasing number of casualties, so is at -4 (that's -1 to their FM roll) but the platoon commander is feeling Secure.
So next up we go to Scenario 5 'Delaying Action at the Chateau'.
In the early rolls Dave slowly begins to deploy onto the table, while I roll a lot of 6s including one triple. I hoped perhaps he'd called on a Werfer barrage for support, but no such luck, so that triple six was wasted. I followed that roll with four 5s and a 6. It then looked like things were getting really out of hand when I rolled four 6s. The random event was the discovery of a wine stash, but with my Force Morale already at eleven, it made no difference. Crazy stuff. While this is all going on the Germans have begun to deploy in force.
 |
 |

So far this is pretty much how I was expecting things to unfold - cautious German advance combining overwatch with tactical movement. It then comes as no surprise to see a forward observer turn up behind the hedges. No unpleasant surprises so far.

With that I decide to deploy the platoon sergeant and the 2" mortar. I'm thinking that if I can isolate some of his sections and block some of the overwatch using smoke, then I can try to inflict casualties on any exposed units when he can't return too much fire.
 |

 |

The Bren teams do their work, causing two casualties and enough shock to break the team and send them racing to the rear. Meantime the German MMG team has moved out into the open to try to find a line of sight to the entrenched Paras.

The Bren section are proving a real threat to the Germans who start to move away from that flank towards the centre. The 2" mortar tries to blind the Pak40 but the smoke drifts and this allows the 75mm to get off a shot at the Paras. There is only one casualty, but it's the Junior Leader and he dies. Fortunately the Sergeant is close by, so I still have command options for the section, but that was an unlucky result for me there. On the flip side the exposed German MMG team is now a target. The Para Sergeant is on hand to use the British Concentrated Fire characteristic to try to take it out and one of the Bren teams manages to inflict casualties and shock. Despite all this the Germans continue to move forward, always making full use of Overwatch and Tactical movement.

 |
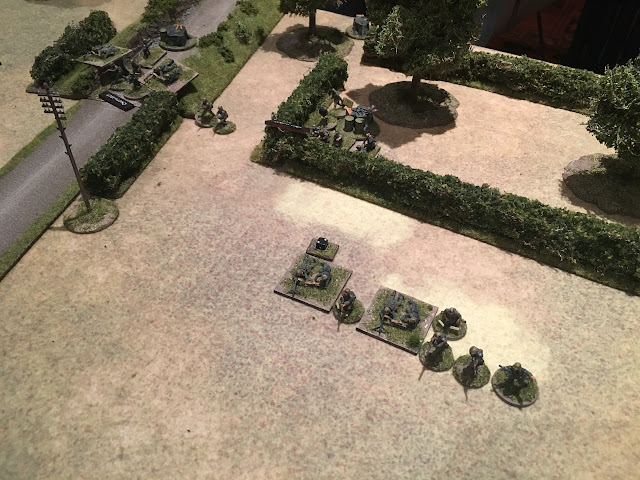
| The Germans shift the emphasis of their attack away from the bren section. |
I think the picture above is an excellent illustration of why the churchyard wall is not a great spot for a defender. All those German units in the open are an incredibly inviting target, but it's an illusion. If we assume the Paras won't be hit with a barrage, they are faced with a possible 47 dice fire attack from the panzer grenadiers in a single phase. Even if they return some effective fire it's a prolonged fire fight they are bound to lose and heaven help them if there's a mortar barrage as well. Dave's tactical approach is a good one and going toe-to-toe with that many panzer grenadiers, even for elite Paras, are poor odds indeed.
I continue to focus the fire from my bren teams on the remnants of the MMG team and finally manage to inflict more casualties and enough shock to see the sole surviving crew member break and fall back. The Germans are steadily moving forward, but they are slowly taking casualties.
The FO moves away from the smoke and when he eventually has a line of sight to the dug in Bren Section he doesn't even bother to call for another ranging shot, but instead calls for the barrage to shift and come down at full effect. He's successful and the Bren section, the Sergeant and the 2" mortar team are all under the barrage. The Bren section is entrenched, so they have some cover, but the others are not, so could be in trouble. I have a CoC die I could use to end the turn, but that will also clear away my smoke. Dave also has one, so I couldn't necessarily eliminate the barrage anyway. Hmmmmm.
 |
| 81mm mortar rounds crash around the entrenched Paras. |
With the German attack shifting towards my left and centre it was time to deploy another section, this time to the other flank. We immediately engage with the nearest German squad and inflict a few casualties, but we also get return fire from the Pak40. Being entrenched helps here and some Shock accumulates, but nothing more serious. This really sees his attack shift to the centre and towards the church.

Despite my fire on the left flank the Germans manage to make it up to the churchyard wall. The Pak40 has turned into a real menace putting some very effective fire onto the section and causing quite a few casualties. With the Germans about to enter the churchyard it was time to pull back and face that direction anyway. Now is the time I need my Bren section, but they remain pinned under the barrage. I decide to use a CoC dice to end the turn. I can afford to lose the smoke now and I have a wounded leader who can get back up on his feet. There are other advantages, as German Overwatch and Tactical markers are removed. Dave counters with a CoC dice of his own to keep the barrage going. I'm not totally surprised, but other than a triple or quadruple six nothing else would cause the barrage to lift.
 |
| The Germans make it into the churchyard. |

The game is now coming to a critical point. We have both taken casualties, but with the Germans now in the churchyard and close to capturing a JoP I decide to use my remaining CoC dice to move that jump-off-point back, instead of ending the turn to try and eliminate the barrage. In hindsight that was a bad move, I think having the bren section back in action would have been well worth the risk of a drop in force morale. At that point it was time to deploy my final section for what I hope will be a decisive firefight in the churchyard.
With one Para section on the left side of the churchyard and the newly deployed one covering the centre I'm hoping I can stall the German advance. I have elite troops behind hard cover, he has regulars in light cover. He does have more firepower, but the odds are less in his favour. I deploy my senior leader at this point, so that he can help influence both sections and get maximum effort from all teams.
 |
| Paras poised to fight it out over the gravestones. |
A furious firefight ensues, but the German firepower begins to tell and the Paras casualties mount disproportionately. Dave manages to roll a double phase at a critical moment. With the first phase he rolls 36 dice and gets three hits. I breath a sigh of relief. His next phase attack is far more devastating and the Para section on my left takes six casualties. To add insult to injury the leaders are really taking hits and that begins to drive down force morale. The Germans have taken a lot of casualties too, but they sense a last push here might just do it. A weakened German squad comes around one side of the church and rushes into close combat with the Para section in the centre. The Paras wipe out the Germans but in the process take a few casualties and a wounded leader and the Para force morale drops to three.
 |
| A small band of courageous Germans prepare to take on some Paras |
 |
| The leader takes another wound and British force morale drops to three |
At this point the Paras are on the back foot. The the platoon lieutenant is a casualty; one section with the platoon sergeant are pinned under the barrage; another section has only two surviving men, and the other is without a leader. The options aren't great. What I have available is outgunned, outnumbered and is supported with more leaders. Sure, the Germans are weakened, but with leaders present and a force morale of seven they have many more options and it's clear which way this one has gone. Chalk up another defeat for the Paras. That said, it's been a close run thing. The Germans took nineteen casualties (fourteen from the platoon and five from supports) while the Paras took seventeen, so despite the loss, the Paras have managed to dish out punishment to yet another German platoon.
It's most likely too little, too late for this campaign. Much will depend on the outcome of the next scenario. The Germans have two attempts at that scenario for campaign victory. I have a fresh platoon I can bring on and the Germans have enough men to create one full platoon. To go the distance I need to win the next scenario and inflict significant loss on the Germans without taking too much myself.
The British finish with the CO's opinion at -5 (that will be one less support next game); the Men's Opinion at -7 (that's -2 to the FM roll) and the Platoon commander's outlook as Sad (I'm not surprised).
The German CO is impressed and his opinion is at +3, the men a little less given the increasing number of casualties, so is at -4 (that's -1 to their FM roll) but the platoon commander is feeling Secure.
So next up we go to Scenario 5 'Delaying Action at the Chateau'.
Thanks for the great read, Always wondered how I would have approached this scenario, good asset to have the 2"mtr when on target, great for blinding and separating sections to concentrate your fire on the visible Team, you've done a great paint job on the Para. cheers JOhn
ReplyDeleteThanks. I think the Brits can always make good use of that 2" mortar to isolate units and then try to take them out individually. It's a great asset for the platoon. Glad you like the Paras, they are all AB figures and a joy to paint.
DeleteCracking AAR it read like a good story - hard luck but I do think your plan was a good one just sometimes the dice dictate otherwise.
ReplyDeleteI do not think spending the CoC die on ending the barrage was an option if your opponent had a CoC die as well. Moving the JOP of ignoring the FM roll would be best - even better would to have had the JP further back in the middle :)
- remembering you can deploy 9" forward of a JOP with elites.
Thanks. Yep, with hindsight I could have done that better, so another lesson learnt!
DeleteDis ist der German hier. It was a tough game and I took a lot of hits coming across the open ground, but the critical moment was getting the double phase when I had all my troops (well 2 1/2 sections and the SL) in the graveyard and getting a bunch of hits. Could have gone the other way....it was one of those games where I had to 'win ugly' - sometimes ya gotta do that. I have to say it is a pleasure using Mark's delightful terrain and figures.
ReplyDeleteGreat AARs! How do you remember the details during the course of battle? Do you keep notes? Use a recorder?What? I find that in the heat of battle I forget to make note of some events and very often, to take photos.
ReplyDeleteDick Bryant
I tend to use my phone to take pictures and then make notes of key events. What I've tried to do with the AARs is to record the key events that influenced the game. I think occasionally I get the detail wrong but feel as though as long as I've captured the essence readers can follow the action. No special tricks to share I'm afraid, but I'm pleased you are enjoying reading them.
DeleteGreat AAR, I'm really enjoying the campaign so far.
ReplyDeleteI find it is generally better to use the CoC die to ignore the BTH roll for losing a JOP than to use it to move the JOP out of danger. The capture might not happen anyway and keeping the CoC die gives you more options. That being said, it's more of a "guideline" than a "rule".
ReplyDeleteI agree. We played this campaign back when I was still relatively new to CoC and as I noted at the time I didn't think it was the best move. We live and learn (too often the hard way!).
DeleteGreat summary of the game. Quick question the senerio states the Germans get 13 support points. You allocated 20. Why is that?
ReplyDeleteHmmm, that’s a very good question. This was our first PSC and it was a while ago. It could be a typo, but to be honest it’s so long ago I can’t recall, but we would have played rules as written so it probably is a typo.
Delete