
The Americans start with force morale of nine and the British at ten. To keep things simple we don't roll for support, but allocate 12 points to the Americans and 6 to the British (this decision partly dictated by the limit we have on available figures).
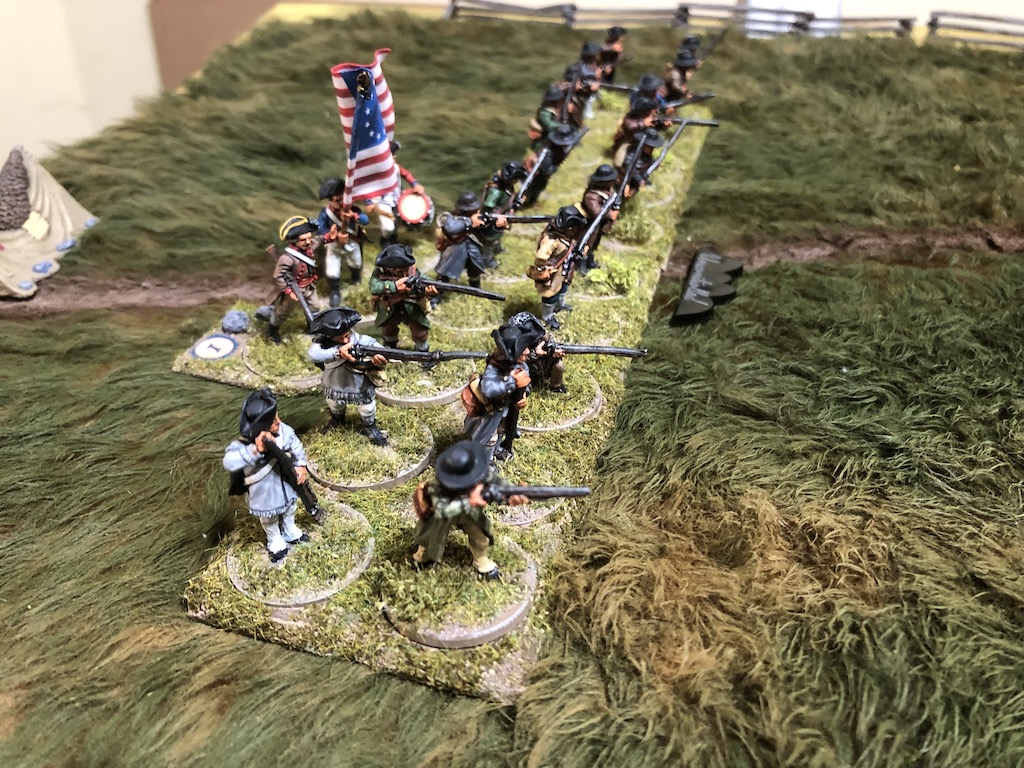
The British force is made up of three groups of regulars under a Status III leader; two groups of regulars under a Status II leader and one group of light infantry under a Status I leader.

I choose to add a Status II leader as support and he is assigned to one of the three groups under the overall command of my Status III leader.

The Americans have a force of two groups of State Line under a Status II leader; two groups of Militia under a Status II leader, and two groups of Militia Skirmishers each under a Status I leader.

For support Dave calls on a group of State Line troops with a Status I leader, a Colour Party and an Exploring Scout.

For support Dave calls on a group of State Line troops with a Status I leader, a Colour Party and an Exploring Scout.

The British start off with three moves and the force converges on the road, with the pay cart safely following behind.


The Rebels deploy in the quadrant in the left hand corner of the American side of the table and once their two deployment points are placed we are ready to start.

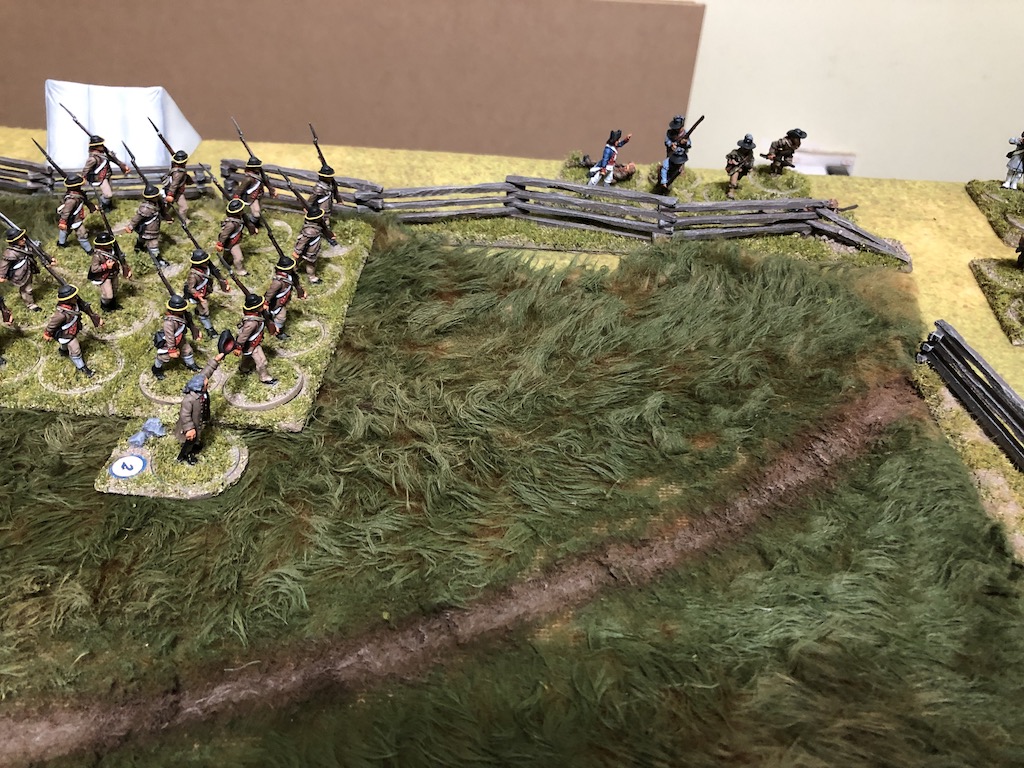
The Americans are first into action and the main body of state line deploy on the left while another group deploy behind the rail fence covering the road.


With that the British send their light infantry up the road ahead of the main body.


Militia skirmisher appear and take up position behind the rail fence to cover the American left flank.
Having acquired four flags but with no immediate use for them I decide to activate my Status III leader again and he shakes the British force into shape for the forthcoming encounter. He orders the two groups on the right to form into line.

He then sends the light infantry forward to take up firing positions behind a rail fence and in true light bob style they cover the distance quickly.

Meanwhile the main body of regulars advance in open column up the road with the pay cart following behind.

The Americans waste no time responding. The militia deploy into the field and open fire on the British light infantry.


Despite the protection of the fence and their ability to make the most of the available cover the lights lose one man killed and suffer four points of shock. It seems there is something amiss with their fieldcraft today.

With nearly all the chips drawn there's no real surprise when Tiffin appears. The Americans use their two flags to deploy another group of skirmishers near the road at the rear of the table.
The British start the next turn by continuing to move in open column down the road.

My plan is to form the men into line once I've cleared the rail fencing and then close the range to make my first volley as effective as possible. However I am taking a risk remaining in column in such close proximity to the enemy. Much of this is because I've over estimated the difficulty of crossing the fence or entering the woods. While it would cause some disruption to the formation it's something that would be very easy to resolve in following phases.


On the opposite flank the other rebel skirmishers open fire, taking full advantage of the benefits of firing at long range from cover.


Their fire is not that effective, but they do manage to inflict a point of shock on each group.

The state line advance up alongside the skirmishers and form into line as they do.

The leader of the British light infantry makes use of two flags to increase his CIs and rally off three points of shock to get his command back into more effective shape. That then brings up Tiffin.
The militia skirmishers move into the grain and open fire on the head of the British column in the road.
The militia skirmishers move into the grain and open fire on the head of the British column in the road.


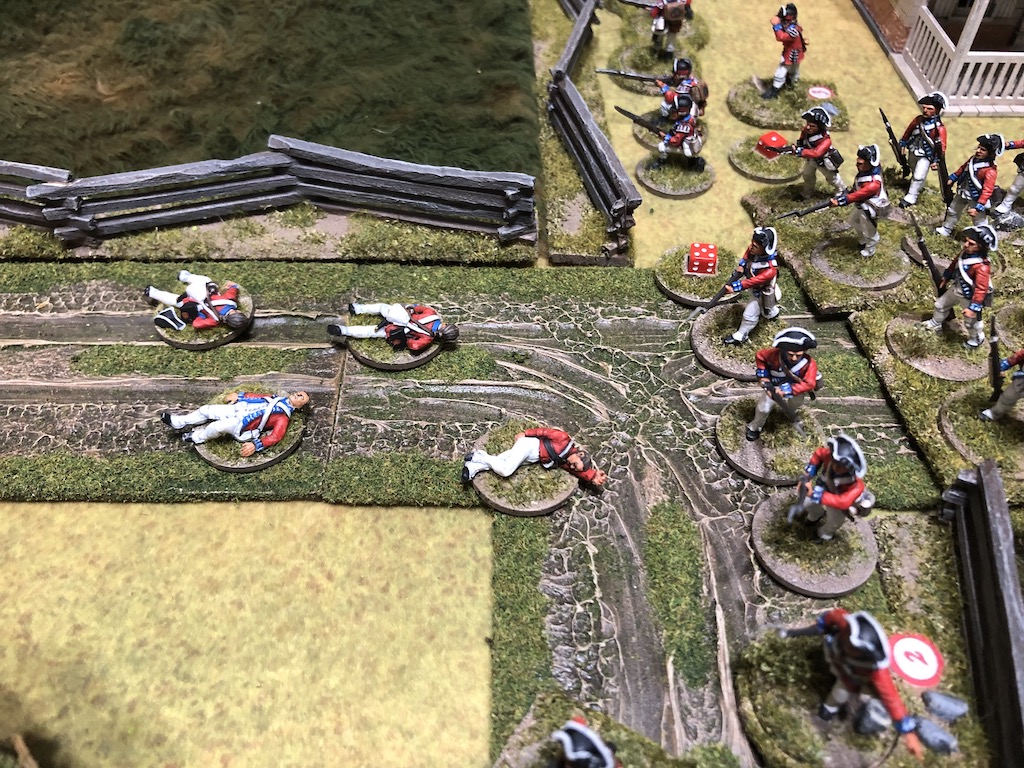
The fire is horribly effective and three regulars are killed. I have since discovered that we were not applying the hits to the column correctly. As the lead group of the column is within 4" of the group to their rear any hits should have been spread across both groups. This would not alter the result in terms of casualties but as will be apparent later in the game it would allow the shock and casualties to be spread across two groups rather than all on one. Nonetheless, have I stayed in column too long and been too aggressive?

Despite the long range the main body of militia also open fire on the hapless regulars in the road.

Yet another regular dies and shock is accumulating rapidly on the lead group in the column (although as mentioned, these additional hits should have been spread across the two leading groups in the column, not only the one at the front).

Despite the problems the regulars are facing on the road the British are able to extract some revenge when the light infantry open fire on the state line in the field killing one man and inflicting some shock.

I've been a little unlucky activating the regulars, yet it was foolish to expect things to go like clockwork. I had hoped to have them form up into line and pour out a devastating volley, but that was before accounting for what the enemy or fate might do. There's some small consolation with the fire from the light infantry, but if massed musket fire is one of my strengths I need to be playing to it.

I've been a little unlucky activating the regulars, yet it was foolish to expect things to go like clockwork. I had hoped to have them form up into line and pour out a devastating volley, but that was before accounting for what the enemy or fate might do. There's some small consolation with the fire from the light infantry, but if massed musket fire is one of my strengths I need to be playing to it.
The rebel skirmishers on the American left edge forward slowly and fire at the British regulars opposite.

The regulars have a man killed and see their shock increase. I need to be careful here as I only have one Status II leader with these groups and there's a danger this constant American fire will see shock build to unmanageable levels.

To make matters worse Tiffin comes up with the British unable to activate a single unit this turn. At the moment they are receiving far more fire than they are dishing out. I really need to get my units moving and do what they do best - a smart volley at close range and then in with the bayonet.
The next turn sees the rebel skirmishers on the American right move through the grain field and fire on the British column. Fortunately this has no effect.


Before the British have a chance to respond Tiffin appears again. The Americans have one flag to use and so activate the state line to fire, but the long range fire has no effect. I know my regulars should display stoicism under fire but I'd really like that to be while they are advancing on the enemy.
Finally I'm able to activate the regulars on my right. They haven't fired yet and while I'd love to return fire on the state line I would rather close the range in order to bring down a really heavy opening volley and so I decide to use my two actions to advance. However the shock slows the men down and they only manage to move forward a total of 2".
Meanwhile over on the other flank the rebel skirmishers open fire on the column once again.
The group at the head of the column suffers more shock and enough to cause an involuntary withdrawal (this may not have happened had we been spreading the hits correctly!). They fall back and break the column formation as they do so. If there is any consolation it is that British force morale remains unmoved by this sudden and involuntary withdrawal.

The British light infantry continue to take shots at the state line and they inflict a few points of shock. I may be returning fire but so far it's lacking the effectiveness of the rebel's fire.

On my right the rebel skirmishers try to work their way around the flank of my regulars and despite using three actions of movement they only come forward 9". Nonetheless with the state line in front of me and skirmishers working around my flank this is a move that can't be ignored.

On my left I try to sort out the debacle on the road. With the column broken as a formation the Status II leader orders the group he is with to follow him into the woods where they will be able to close the range with the rebels without taking fire. This is something I should have considered much earlier with the whole column. I'd worried too much that crossing the fence and moving into the woods was going to be slow and disruptive to the formation, but in hindsight that was unnecessary. However before the group moves off the Americans interrupt the move and the militia open fire. Fortunately it's at long range and the group receives only a point of shock.

Tiffin comes up and the new turn sees the state line in the road open fire. More shock is inflicted and my main column has turned into an ineffective rabble. There is a distinct lack of effective British leadership at the moment and the rebels continue pouring musket fire up the road.

It's a sorry sight. A road littered with casualties and the survivors stumbling back in shock through the other groups.
With my dreams of forming a line of steady redcoats and unleashing a devastating volley now gone the best the regulars can do is advance a group forward and fire back down the road. It's not the plan I had in mind, but I need to return some of this fire.


It's not without effect and the state line suffer some shock.

When Tiffin comes up I decide to use my light infantry more effectively and have them deal with the threat the skirmishers have presented on my right flank. I use a red flag to activate them and with three actions of movement they dash along the fence line and end up very close to the skirmishers.


On the other flank a group of regulars moves slowly through the woods to try to hit the rebels in the grain field. With the start of a new turn the chit draw finally favours the British and the first leader activated is the light infantry. It would have been nice to use Thin Red Line but as this is the first chit draw of a new turn I will have to send the men in as they are. The skirmishers make a rather unwise decision given they have no bayonets and their weapons are unloaded and they choose not to evade.

The skirmishers leader is wounded and his command initiatives drop to zero and one of the skirmishers is killed. The light infantry come away unscathed and so drive the skirmishers back. The light infantry are showing the regulars how it's done, although it may be too little too late.

With the threat of the skirmishers removed perhaps my regulars can finally close on the state line and give them a volley. The chit draw is kind to the British once again and the regulars leader is activated. He removes a point of shock and orders the line forward but it is still frustratingly slow and they end up just beyond 12" range.

Despite the light infantry driving off the skirmishers the rebels on the other flank continue to harass and fire on the regulars in the road.


The skirmishers are bold enough to advance out of the grain field and they add their fire. Another redcoat drops to the ground and shock accumulates. Those rebels should be punished for their audacity.


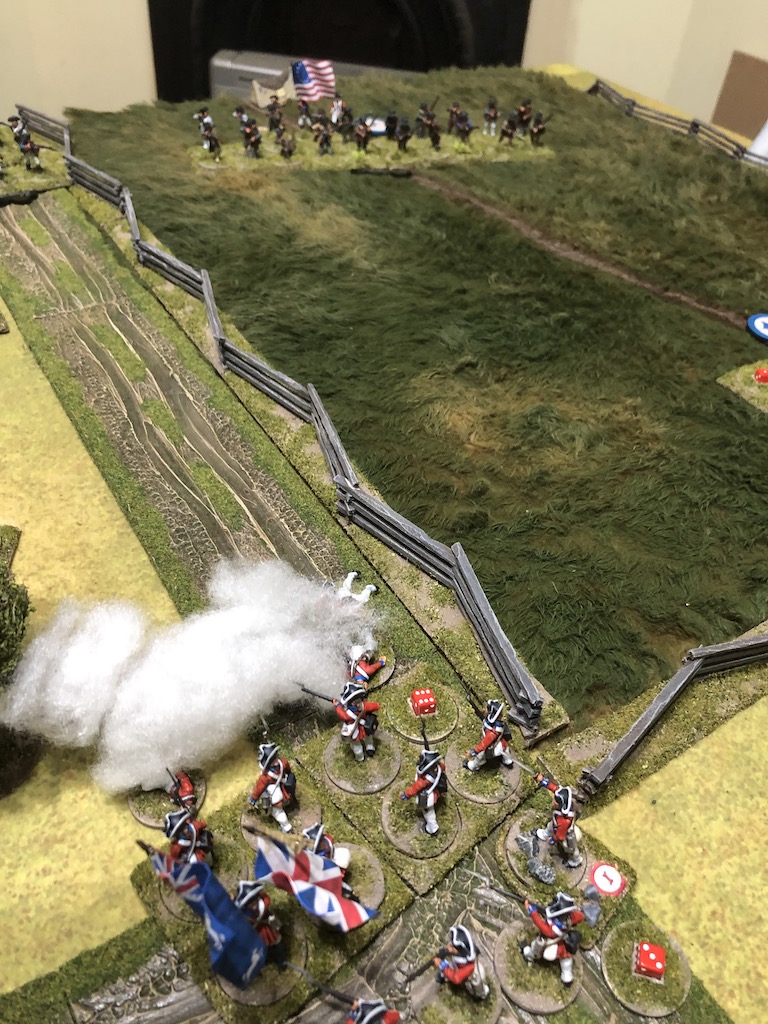
The new turn sees the regulars advance to within close range of the state line and finally I'm in a position to make the most of the regulars musketry.


I'm going to need something to happen on that flank because the regulars in the road continue to suffer from the volume of rebel fire.

Despite the presence of the best British leader the amount of shock that has accumulated is making any effective response here almost impossible.

The state line in the field fire off a volley at the regulars and add shock to the formation. That must be the third or fourth volley they have fired and the British are yet to respond.

On the other flank a group of regulars work their way through the woods in an attempt to drive off the rebel skirmishers who have wisely pulled back into the grain field.


Meanwhile the militia in the field continue to pour fire into the road. They have done nothing but fire in an uncontrolled manner since they deployed and even though it has been at long range the steady stream of musket balls have done their work.

The leader of the British force rallies off as much shock as he can from the smaller group and sends those three men forward to join the group in the woods.

I had hoped the British commander could rally the group in the road, but more rebel fire inflicts further shock that sees them withdraw involuntarily. What a debacle!

I can see this is just not going to be the Briton's day as the first draw of the next turn allows the state line to unleash yet another volley at my regulars.

The regulars take more casualties and shock builds up even further, with six one group and four on another.

When this is added to the disarray of the regulars on the road it's clear that the rebels have won the day here and it's time to call it a day.

Well that was a well fought victory for the Americans, whose sustained fire was able to disrupt the regulars and prevent them from using any of their advantages. Aside from the aggression of the light infantry the British suffered from command paralysis and poorly thought out tactics. I was certainly far too hasty sending the main column down the road as I did. I was right in wanting to close the range but I should have been a little more careful about how I did that. Had I worked those groups around to my left flank and used the cover of the woods I could have achieved my objective without having to suffer so much American fire. That was just poor tactics on my part.
It would also help for me to get a better grasp of the movement rules for groups and formations. With a Status III and a Status II leader I should have had no problem breaking formation, moving across obstacles and other terrain and then forming up again. That's a lesson learnt.
Until I used my light infantry to drive off the skirmishers I had allowed them to remain very static and not taken full advantage of their speed on the battlefield. As always with hindsight I can see how I would have played much of this very differently.
I had some bad luck with the chit draw but that's never an excuse for poor tactical play and any player who doesn't factor in friction only deserves what befalls them. Despite the loss that was a great learning experience and an enjoyable game. I look forward to playing more Sharp Practice and even more to playing it a lot better than I did today.
I've found that if you put all of your regulars into one big-long line first, then advance in line and Fire away, even at long range, all of those muskets firing is like a machine gun. The guy on the receiving end of all that might take it for one turn and then fall back to get out of range of all that firepower. Then use your lights to drive off the American skirmishers or work around the flanks of the Muricans.
ReplyDeleteI think I was trying too hard to be historical, you know, march up into close range, unleash the deadly volley and in with the bayonet. The moment the rebels started firing I should have just fired back. We live and learn!
DeleteReally enjoyed the write up, at one point you said the tiffin card came up and the rebels used 2 cards to deploy some skirmishers,I believe when the tiffin comes up the cards can only be used to activate units on the table who have not yet been not to deploy new units-a rebel trick no doubt
ReplyDeleteClive
Thanks for pointing that out, another rule we missed or forgot about.....
DeleteLooks like a cracking game! Highly entertaining AAR as always. I‘m still trying to get to grips with SP but as it’s actually not my period(s) I find it a little difficult to muster the enthusiasm to delve as deep into the rules as they would deserve. Well, my gaming buddy at least has a good grasp...
ReplyDeleteYou make me so jealous with your AWI and SP2. It’s a project that I have in mind but haven’t even started yet.
ReplyDeleteNice bat rep. Great to read and follow along. I was rooting for you right up to the end and then I switched loyalties. 😀
A really great report. I can understand your frustration. The Card Draw activation system sometimes results in uneven results, but that's just luck of the draw. I usually try to screen my Line troops with skirmishers until they get close enough to do some Close range damage with maybe a Thin Red Line thrown in. Usually I don't get the cards to do so. I love SP and can't get enough of it. Unfortunately some of the guys in my Group don't like it, so I enjoy reading AAR's like yours and watching SP replays by Tabletop CP on YouTube. If you are interested, Tabletop Simulator on STEAM allows one to play SP online. I have a couple of scenarios posted in the Workshop section. Just send a Friend request to "bandrsntch" and they will be available to you.
ReplyDelete