

Dave would take the French who represented units from the 3rd Armoured and 3rd Motorised Infantry Divisions and would include a 1940 infantry platoon with list 20 support (which must include one Char B1 bis and one other AFV).

The French would start the patrol phase from the right hand side, the Germans within 18" of the left. One thing that was quickly apparent was the lack of fall back options for the Germans, their defence would need to be fairly forward. However there was a risk of being overwhelmed and so I would need to consider an option for one jump off point somewhere to the rear which could become the focus of any last ditch defence.
The French started off well with a force morale of eleven, the Germans less so with force morale of nine. With that the French rolled for two additional patrol phase moves and we both edged forward to try to grab the most advantageous pieces of ground. I was reasonably happy with my JoPs, I could cover both flanks and had a fall back position should the French armour roll through my first line of defence.
 |
| German JoP in red, French in blue |
The French get off to a brisk start by rolling a double phase, but with two sixes and two fives the only activation dice was a four and so the French waited to see what the next roll would offer before deploying. Their next phase opens with the roar of two motorcycles as an Escouade de Eclaireurs advanced up the road. A bold move, no doubt designed to provoke a German reaction.

In the woods the platoon's Tromblon VB launcher grenadiers had formed a single combined team and deployed ready to provide covering fire. This would be the first time we had used rifle grenades and with five of these the French have the potential to lay down quite a bit of fire.

The German command roll that followed included a double phase and that turned out to be quite a gift. I didn't have to ponder long before deciding what to do - those motorcycles were just too tempting a target and I could deploy into a stone building to fire at them.

Which is exactly what I did. A squad deployed, with the LMG and a few riflemen on the upper level and the remainder at ground level.

Their opening burst of fire was vicious with nine hits. With no cover that resulted in three kills and three shock. The corporal was one of those hit and he was lightly wounded, the team was pinned and French force morale took an immediate drop down to 10 as a result.

The follow up German phase saw a repeat of the same fire, this time resulting in a single kill, but that was enough to see the team wiped out leaving only the wounded leader in the road. French force morale took another drop at the loss of the team and was down to nine. With that satisfying result the Germans choose to do no more in the phase.
 |
| And then there was one.... |

I sense Dave is going to be a bit more cautious after the chastening experience with the motorcyclists. However it did mean the wounded motorcycle leader remained helpless in the road, surrounded by his dead command.
That was too much temptation for the German squad who used the next phase to target the wounded leader. He is hit again and dies. French morale drops once again and is now down to eight. That's three very valuable French force morale points lost as a result of the motorcycle team, an expensive move.

While the motorcyclists may have been a relatively easy target for the Germans, the arrival of a Char B1bis is an entirely different proposition. A few rounds from that 75mm gun has the potential to make life very uncomfortable for any occupants of the farm house. Fortunately there is no line of sight from where the tank deploys, but it is only one or two phases away from being able to take a shot.

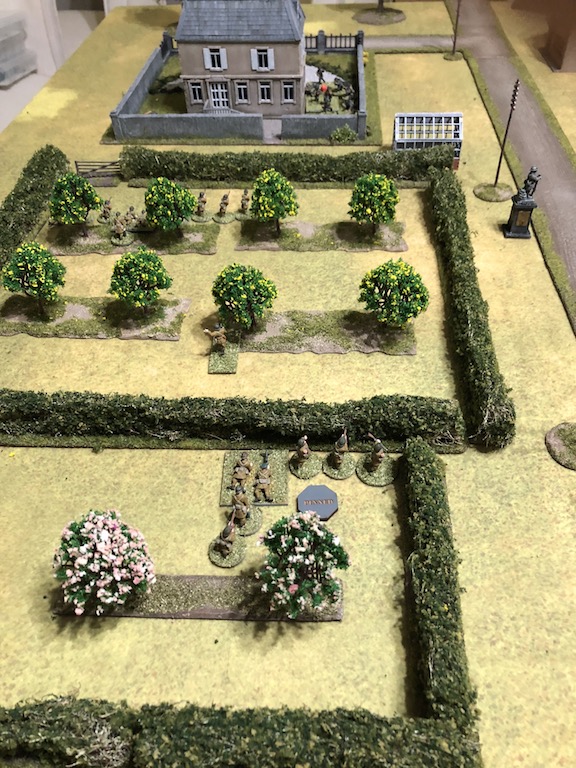
Meanwhile the French squad on the left flank advances over the hedge and into the orchard.

With no new targets in sight and still three French squads to deploy, plus unknown supports, the Germans sit tight and only deploy the 50mm mortar to the rear of the table.

The next French command roll includes 3 fives and so with limited activation choices the French deploy a second squad into the orchard on the left. There's a real threat building up on that flank that the Germans cannot ignore.


The Germans roll another double phase. Much like the French I'm also rolling a lot of fives, so while we are both accumulating CoC points we are stuck with limited activation options. This roll is a case in point with only a 1 available. So with that I do no more this phase and move to the next.
The Germans roll yet another double phase, but this time have a few more activation options and I deploy a squad on my right in front of the chateau to deal with the advancing French.


The Char B is clearly going to be a problem, so I decide to pull my squad out of the building. There is no point gifting the French any easy targets and my squad has performed some fine work dealing with the motorcycle team.

In the following German phase the squad on the left moves to the wall behind the ploughed field so they can cover any possible advance on that flank.

Meanwhile the German squad behind the orchard is placed on overwatch in anticipation of the arrival of the other French squads.

With two French squads coming through the orchard there is clearly going to be a major effort on this flank. I don't want to deploy another squad just yet, but in anticipation that I will need to be able to have all options open I deploy the German Feldwebel into the chateau grounds.

The French get the Char B moving down the road, while on their left flank one squad attempts to move to the hedge and then fire, but they fail to move fast enough. The other squad advances to the hedge line and into sight of the Germans on overwatch. They promptly open fire and inflict five points of shock.

With the Germans now spotted the French squad calls on the rifle grenade team for some fire support, but they only manage to put a single point of shock on the Germans.

On the French right a third squad deploys into a patch of brush beside the barn and take up tactical positions.


A brisk firefight is now taking place in the orchard and the Germans call on the 50mm mortar for some indirect support of their own and it adds some shock to the French by the hedge. More significantly, when the German squad opens fire they produce a more drastic result, killing three of the Frenchmen and adding another two points of shock.

The French squad is on the receiving end of a lot fire, but the French command roll doesn't leave too many options. With only a single senior leader (the Platoon Sergeant only ranks as a Junior Leader) they do not want to make use of any rolls of four just yet and here the command limitations of the large four squad French platoon are exposed. Making use of the activation dice that are available the squad tries to pull back from the hedge line, but with so much shock they can't get moving.
The Germans seek to take full advantage and in the following phase the German squad fires once again, killing another Frenchman and adding enough shock to pin the surviving men. The 50mm mortar tries to add to their discomfit but fails to hit.

The German squad on the left takes up overwatch positions behind the wall around the ploughed field ready to confront any French advance on that flank.

In the French phase the Char B edges forward slowly and with a line of sight from the turret the coaxial MG fires over the wall around the ploughed field at my squad. It has no effect. I'd forgotten about the height advantage of the turret and had unwittingly assumed my squad was out of harm's away. Thankfully he won't be able to target me with the 75 as it's mounted in the hull.

On the French left the pinned squad decides to stay where it is and fight it out, but its fire has no effect. The same cannot be said for the other squad who make the short move to the hedge and fire at half effect registering seven hits that lead to three kills and a point of shock. This was followed quickly by a flurry of grenades from the VB launchers which killed one of the LMG team and wounded the junior leader. German force morale drops to eight and with four men killed and a wounded leader it might be time to pull back to the chateau.
The German phase see a lot of CoC points yet limited scope for activation. It's enough for the right hand squad to call in a few mortar rounds from the 50mm before they pull back to the grounds of the chateau.


The French then roll a double phase which sees the Char B advance slowly once again, spraying fire from the MG at the German left flank squad behind the wall. This time the fire is very effective, killing two men including the junior leader, which is a major blow and German morale drops two points down to six.


To apply even more pressure a Hotchkiss MMG team deploys into the upper level of the barn and kills another member of the German squad behind the wall. The Germans get some revenge when their overwatch fire kills one of the Hotchkiss crew and inflicts two points of shock. While there is some satisfaction in that, I'm definitely feeling under pressure on both flanks and have to face a second French phase.


The Char B edges forward once again, firing the coaxial as it goes. This time I'm relieved when it has no effect.

The Platoon Sergeant deploys behind the barn and orders the squad in the nearby brush to move forward to the wall, while the Hotchkiss provides covering fire. This time its fire is not nearly as effective and my squad is unscathed.

The Germans have now taken casualties on both flanks and I'm really feeling under pressure. In my next phase the squad on the left now falls back. Before they do, they call in some supporting fire from the 50mm mortar that proves ineffective. With the Hotchkiss on the upper level of the barn the German squad needs to make this move carefully and so move tactically to take advantage of whatever cover they can find.


Meanwhile on the right flank the squad falls back further into the chateau grounds to regroup. I've been pushed back on both sides and taken a number of casualties along the way.

The Char B is turning into quite a threat and my anti tank weapons will most likely have trouble dealing with it. This was a reason my supports including two anti tank guns and a tank, on the assumption I will more likely get the crew to abandon the Char B after multiple hits than have the chance to deal with it with a single blow. For now I do nothing about it, I need to wait until it's in a position where I can bring a few guns to bear if I've to have any chance.
As I ponder what to do next the following French phase sees the arrival of a second tank, this time the diminutive R40. It's small but tough and it too may prove hard to deal with.
As I ponder what to do next the following French phase sees the arrival of a second tank, this time the diminutive R40. It's small but tough and it too may prove hard to deal with.


With the French armour pushing forward and German squads falling back the French squad on the right flank climbs over the wall and advances into the ploughed field.

They are well supported, with the Char B close by and the Hotchkiss in the upper level of the barn. The Hotchkiss can still see the German squad that has fallen back, which is one reason I moved back tactically. The Hotchkiss fires and I'm fortunate to escape with a point of shock on the LMG team.

Meanwhile on the French left the Platoon Lieutenant deploys and begins rallying shock off the pinned squad to try to get the assault moving again on that flank.

The next German phase sees more CoC points accumulate. This can be annoying at times, however I like the fact I have two full CoC dice ready to use and I suspect they will come in handy as the game progresses. The Feldwebel (SL) moves around the chateau and rallies shock off the squad.

On the opposite flank the LMG team manages to move to some cover behind the farm house, but the rifle team find themselves still exposed to the Hotchkiss.

The following French phase also sees CoC points accumulate rapidly and their only other action sees the Platoon Lieutentant spend the entire phase rallying shock of the pinned squad in the orchard.
The Germans try to bring the remainder of the squad on the left into cover behind the house to join the LMG team, but before they move the French use a CoC dice to interrupt with the Hotchkiss. It inflicts another two points of shock to take their shock up to four, but fortunately the tactical movement roll is a six which allows the team to continue to edge towards cover.

In the chateau the German medic deploys to come to the aid of the wounded squad leader. Perhaps the use of a support point for the medic will prove worthwhile after all.

In the French phase the R40 moves flat out down the road to join the Char B.

The Hotchkiss continues to pour fire at my exposed rifle team. This time the fire is more deadly and the Germans lose two men and accumulate another three points of shock, enough to pin the squad. However the French are not quite finished yet and the Hotchkiss can call in the VB launchers to fire off their final volley of grenades. They crash around the rifle team and inflict enough shock to break the Germans who fall back in disarray.

With German force morale at six and a potential loss of a further two points I decide to burn up a CoC dice to avoid the force moral roll. I may still have units to deploy, but I'm now feeling under a lot of pressure and as I fall back it dawns on me that there is not much in the way of defensive terrain behind me to reform in. I really need to try and hold that forward line, but the weight of French units against me makes that look untenable.

With German force morale at six and a potential loss of a further two points I decide to burn up a CoC dice to avoid the force moral roll. I may still have units to deploy, but I'm now feeling under a lot of pressure and as I fall back it dawns on me that there is not much in the way of defensive terrain behind me to reform in. I really need to try and hold that forward line, but the weight of French units against me makes that look untenable.

Yet things are never quite as bad as they seem, and the Germans get a double phase at a critical moment. It's very welcome. Now is the time to consider deploying my anti tank weapons, with two phases I may be able to inflict enough shock on the Char B to force the crew to bail out. So the Germans deploy the Pak 36 in a small orchard near the road junction where it can target the Char B and cover the road.

Dave comments that I've deployed the "door knocker" and with AP5 against armour 6 they mirror my thoughts exactly. Despite the odds fortune goes the way of the gunners who score four hits and the Char B is unable to make a single save. The end result is catastrophic, as the Char B burst into flames. With two rolls to be made on the morale table, Dave decides to cash in his remaining CoC die to avoid one of them. Nonetheless this is a blow to French morale, which drops two points down to six.


Well, that was a most unexpected result, not only a double phase but a critical hit from the Pak36 which has taken out the powerful French tank at the first attempt. Someone has earned themselves an Iron Cross.
Over on the other flank the Medic does fine work with the wounded leader, who returns to full effectiveness after some tender care.

With the Char B knocked out the French attack on their right flank becomes far less threatening, in fact the squad in the ploughed field suddenly looks a little over exposed. In the following German phase I deploy a squad to the upper level of the farmhouse by the field and open fire, inflicting four shock. While I will still have to face the Hotchkiss and the return fire from the squad in the field I feel I have to take full advantage of catching an enemy squad in the open like this.

Now also seems a good time to deploy the PzkfwIII and to start trying to apply some pressure of my own. A game will often pivot on a few critical events - a double phase, a killed leader or a knocked out support. The key is to grab the opportunity and seize the initiative.


While the loss of the Char B is a blow, the French still present a number of threats. On their left the Platoon Lieutenant rallies off more shock and while the squad remains pinned the majority of the shock has now been rallied off. While I've stalled their advance I haven't been able to break them or finish them off.

To maintain the pressure on both flanks the fourth French squad deploys into the brush besides the barn on the French right, ready to support the squad in the ploughed field. Despite the fact the Platoon Lieutenant is on the table the squad have no trouble deploying. As they arrive they fire at the upper level of the house near the field at the recently deployed German squad, but to no effect.


Now feeling very exposed the French squad in the ploughed field returns fire at the Germans in the farmhouse, but while I have them in the open I think this is the perfect time to use a CoC die and interrupt. The French take eight hits which result in two kills on each team and two points of shock. Their junior leader is one of those hit and he suffers a light wound. The French must be getting hardened to their casualties as this has no negative effect on their force morale.

When the French do finally fire, it's effective and they wound the German junior leader, but much like the French this has no impact on German morale. The French follow this with fire from the Hotchkiss, yet despite seven hits the ample good cover provided by the stone farmhouse results in only a single point of shock on each German team.
Without any more ammo for the VB launchers the grenadiers now advance to the edge of the woods to take up a role as riflemen.
Without any more ammo for the VB launchers the grenadiers now advance to the edge of the woods to take up a role as riflemen.

In the German phase the PzkfwIII drives towards the sound of gunfire. On the left the German Leutnant (SL) deploys to the farmhouse and orders the squad LMG team in the upper level to fire into the ploughed field once again and the rifle team to lay covering fire on the Hotchkiss. The LMG inflicts four points of shock on the French in the field which is enough to see them come within one point of being pinned.

With the squad in the field so exposed I decide I should really try to capitalise on this and so I use another CoC die to spring an ambush which will allow me to have one more unit fire in this phase. The MG34 team from my remaining undeployed squad appears at the field wall and fires into the field killing one and adding another two points of shock, enough to pin them.


Their work done, the LMG team then slip away again. That leaves the French squad pinned in the open with ten points of shock and a wounded leader with a single command initiative - that will keep them out of action for several phases at the very least.
The French look to bolster their resolve with additional support and the squad in the brush send its LMG team forward to the wall.

On the left flank the French Lieutenant rallies off the remaining shock on the pinned squad and orders the other squad to advance over the hedge. Dave has now used up all his CoC die for now and so won't be able to end the turn himself. Even though the squad now has no shock it will remain pinned until the turn can end. For the moment the French cannot take advantage of pushing back some of the German squads, things have stalled a little on each flank.

The French can still bring a lot of force to bear, so while their momentum may have been interrupted they still present a considerable threat. I'm particularly concerned that if I don't hold them at my current line I will find myself in trouble as there is little suitable ground behind me from which to form a new line of defence. With that in mind the PzkfwIII moves forward towards the farmhouse and the ploughed field to provide support to the squad there.

At the same time the Leutnant (SL) orders the LMG team in the farmhouse to continuing pouring fire into the ploughed field while instructing the rifle team to try to keep the Hotchkiss suppressed with covering fire. The French suffer another man killed and a point of shock, that takes the six remaining men to eleven points of shock. They are on the verge of breaking.

The French Lieutenant tries to get things moving on the left and directs one of the squads to advance towards the chateau through the orchard. Deciding he can do no more for the pinned squad he follows the advancing squad.

Over on the other flank the squad fires their LMG up into the German squad in the farmhouse, while the rifle team advances to the wall to join them. The LMG fire is joined by the Hotchkiss and between them they kill one of the Germans and knock out the leader. The wounding of the leader results in German morale dropping two points down to four. As I used my last CoC die for the ambush there is nothing I can do but take the drop in morale. I could be in trouble here and need to be careful.

With only four command dice I am very fortunate to roll something close to a perfect command roll with 6 6 4 3. That gives me a double phase and some good activation options. This could be the decisive moment.
The PzkfwIII drives up to the wall of the ploughed field.

While the tank moves up the German Leutnant tells the rifle team to redirect its fire into the ploughed field and join the MG34 in trying to break the French squad. The fire is particularly effective, with the French losing another man killed and the leader taking a second light wound. That brings the leader's CI down to zero which sees him die and enough shock has now accumulated to break the surviving members of the squad. The two subsequent rolls for force morale for the leader dying and squad breaking take French morale down two points to four, the same as the Germans. That now puts the game on a bit of a knife edge, but with a second phase about to come my way I sense the advantage is now with the Germans. How to make the most of it?


The next German command roll allows the PzkfwIII to activate and I realise I now have line of sight right down the road through the woods to the R40. I thought it might be obscured by the burning Char B but the line of sight is good and within the turret's covered arc. The shot hits the R40 and knocks it out before it has even had a chance to fire a single round. The loss of another support sees French morale drop once again and it is now at three.


At that point it's clear the French are not going to swing this one their way and Dave calls it a day. French morale is at three, the Germans at four, but with the loss of all the French armour the French infantry will find themselves at the mercy of the PzkfwIII.
That was a very enjoyable game which, until the loss of the Char B, felt as though it was going the way of the French. The loss of that tank was a pivotal moment and the first of two occasions when the Germans were able to fully exploit a double phase and do some serious damage. A bit of good luck certainly played its part as I never expected to see the Char B go down quite so quickly or easily.
Playing early war allows armour to have a much bigger involvement in the game. The proliferation of infantry anti-tank weapons later in the war make this level of combat particularly dangerous and so it was nice to feel freed up to make bolder use of our armour. The four squad platoons on the other hand are a bit cumbersome. While the Germans can benefit from two senior leaders, there is quite a noticeable difference for the French, with only a single senior leader and a limited role for the Sergeant. On paper it seems like a small difference, but in practice you can see how it restricts command options and tactical flexibility. Once again Chain of Command demonstrates how it really does an admirable job of exposing how these sometime subtle organisational differences can impact on tactics at this level.
Dave has done a splendid job pulling together his early war force and with his BEF nearing completion we are looking forward to more early war action in the not too distant future.
Thanks Mark for a great AAR, I have not played any early war games,there seems to be a common thread by German players facing early war French, fear of the Char B tank.
ReplyDeleteGreat shot by your anti tank crew.
cheers John
Thanks John, the odds are certainly in the favour of the Char B. With average dice the PaK36 can expect something like one net hit every second shot, same with the PzIII, so my original plan for that double phase was to deploy as much of my anti tank weaponary as possible and pepper the Char B with fire. But every now and then Lady Luck smiles on you and that was certainly the case here.
DeleteAnother fine report and supporting photos, looking forward to next one.
ReplyDeleteThanks Phil, while we consider what campaign to play next I’m sure we will find time to squeeze in another early war scenario.
DeleteVery nice CoC AAR. Armor in early war is more fun: in later war it’s almost a liability bc there’s so much antitank out there.
ReplyDeleteI have always found that’s it’s very hard to attack in CoC. I think the French did pretty good, for being the French. 😀
The French look like they can be quite tough, a bit of good fortune certainly helped the Germans here and until then I was feeling under a bit of pressure.
ReplyDeleteAs ever, a joy to read. I really wish I could convince my gamer friends to give CoC a try as it sounds like a great game. I look forward to the next installment.
ReplyDeleteShame your friends won’t try it, I’ve found most gamers once they actually play a game, quickly take a liking to it.
DeleteGreat looking game. Thank you for this wonderful AAR!
ReplyDeleteHow do you make the maps you have a the top of the post?
Thanks, glad you enjoyed it. The map was made using PowerPoint and then saved as a jpg. Rich Clarke talked about how he did it in one of the Lardie Specials, although if you’re familiar with PowerPoint you can work it out fairly quickly yourself.
DeleteGreat looking game and nice forces; getting a bit of an early war itch and this batrep has been no help :D looking forward to seeing more French v German battles
ReplyDeleteA lovely AAR. My wargaming partner Iain and I have been fighting a campaign through, over and around Stonne since January , and are having a great time of it. To see someone else's take on things is great.I ignored the general rules and made the GrossDeutschland Company Elite, which helps the individual soldiers but means I rarely get enough support to deal with armour. Our campaigns on a knife edge with my Germans having retaken Stonne against stiff opposition... next chase out into the open for another Scenario 4...
ReplyDeleteHighly enjoyable AAR! Thanks for sharing.
ReplyDeleteGreat report! Thanks for sharing! How did I miss this from back in August? I thought the French platoon sergeant was still a senior leader but with the CI and range of a junior leader? So he could still order around platoon support options, just less effective?
ReplyDeleteYes, you are right, but we assumed he activated on a 3, just like the other JLs but had the ability to influence the whole platoon. Not sure if that’s a correct interpretation but that’s how we played it, same with the Japanese Gunso.
DeleteI should just add we played this before the 1940 handbook which is quite specific that they activate on a 4. That would be how we would play it in future.
Delete