This first batch are Perry plastics and they make up three groups of regular centre company men. While ensigns and colours are not really part of the game, they do bring a group of figures to life and so I've painted up two ensigns and a drummer to add some colour to the unit. The flags are from Battle Flags and in this instance we have the 7th Regiment of Foot (Royal Fusiliers) and the King's Colours.
The miniatures are based on 25mm round MDF, but for ease of movement during games I plan to have them on sabot bases holding four figures each. All the bases are from Warbases. This is the first time I've used sabot bases and the only thing I don't like about them is the thickness of the base itself, given it is in effect double thickness.
 |
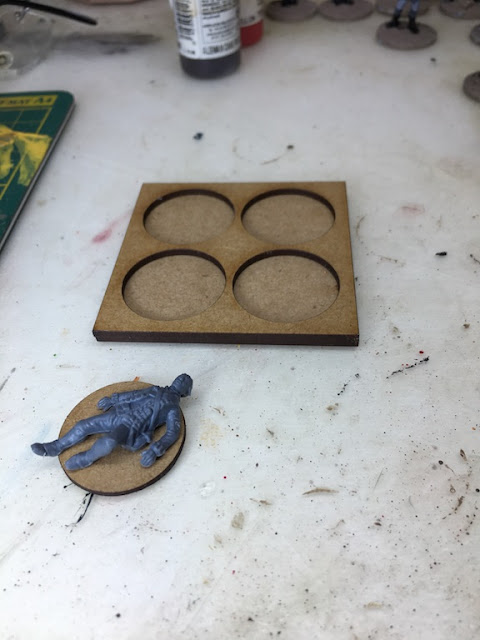
| The original Warbases sabot base for four figures |
So I have used the sanding mode on my trusty Dremel to round off the edges and give them a rougher, more natural look.
I then covered the base with PVA glue being careful not to get it into the actual slots, the glue was then coated with sand. Once dry, they were then sprayed with a grey primer.
They were then flocked just like my normal bases for individual figures.
The one issue with sabot bases is how to handle kill results, as a gaping hole in the base is always guaranteed to spoil an otherwise good effect. I plan to do three things. Using 25mm bases I will use dice frames to make markers to show shock. Once a base loses a man as a casualty these shock bases can replace the miniature. I also plan to create casualty figures to also fill these places. The Perry British sets come with two casualty figures and I plan to acquire some of their metal casualties as well. These will be mounted on a 25mm base.
Last, but not least, I will make up some blank 25mm bases with my normal ground terrain and flock. It's all about the detail!
Leaders are rated by number of command level and so in order to remember what these are I've mounted leaders individually and used rocks to record their command level.
Meanwhile on the paint table I have two groups of light infantry and they are mid way through painting. I plan to complete the British first and then get on to the Continentals, but in my spare moments I've been assembling and basing these. Once again they are the Perry plastics.


This comment has been removed by the author.
ReplyDeleteLooks fantastic!! I've been wondering for a while what kind of flock/static grass you use. It looks so natural and so do the bushes! been trying to achieve that look but sadly can't figure it out!
ReplyDeleteAnyways great work as usual :)
(accidentally deleted my first comment when trying to edit!)
Thanks. The grass is flocked first and then I apply static grass on top, it really adds some depth. The small bushes are from Army Painter. Seems like a lot of effort sometimes, but a good base really seems to set off the figures well.
DeleteI'll have to try it out then :)
DeleteThanks and keep up the good work, I see you have some Americans in the queue ;)
They look great! I'm really looking forward to seeing your progress and battle reports, always a treat. I'm working on three different SP2 projects at the moment: ACW, ACW era imagination forces for Europe, and AWI forces for the New York frontier and the Sullivan Expedition.
ReplyDeleteSounds like you are going to be busy with the paint brushes! Sharp Practice really does lend itself to so many different conflicts, all of which are very tempting.
DeleteVery nicely done, I like your idea about taking down the edges on the sabots as I have several for SP2 and SAGA.
ReplyDeleteJohn
Thanks John, I'm pleased with the way the sabots have come out, I think they will be less visually intrusive this way.
DeleteBeautiful minis.
ReplyDeleteThanks, glad you like them.
DeleteVery nice painting and basing with the MDF plates.
ReplyDeletecheers John
Those are fantastic - excellent painting and basing. It all comes together very nicely.
ReplyDeleteThanks Giles, I have to confess your blog has been a huge source of inspiration, not to mention a mine of useful information.
ReplyDelete