
 |
| A Kangaroo lost to a Kriegsmarine supermine in Scenario 2 |
 |
| British engineers remove the minefield in the first playing of this scenario |
So far I’m pleased with the progress here, my Germans have given the British a bloody nose and delayed them for a full campaign turn. I’m not expecting to hold them back again (although that would be nice), so my main aim is to fight to the bitter end hoping to inflict maximum casualties.
What will the British call on for support? I fully expect to see a mortar barrage and some armour. The house by the bridge represents the only decent defensive position, so I must be careful not to group all my defenders here and have them neutralised under a barrage. The open ground on my right flank is not a great alternative, so my thoughts are focussed on whether I can place a JoP across the river near the house at the opposite end of the bridge. It’s a defensive position that offers no alternative but to stand and die. Given that’s essentially what this defence is all about, it’s one of the few times I would seriously consider a location like this as it leaves the defender no options for a safe withdrawal. I will try to see what gains I can make in the patrol phase and much will depend on how many free moves the British start with in that phase.
Force morale will see both sides at nine. Despite winning the initiative they only manage one free move to start the patrol phase. This presents the Germans with the opportunity to locate a JoP across the river. I only want one over there as I don’t intend deploying more than one squad unless things really shift in my favour, which is unlikely. I fully expect to lose the squad and most likely the JoP, so it will only make sense if I can inflict casualties and push British force morale down further than mine will go should I lose that position and the men in it.
The patrol phase goes well from a German perspective and I’m able to get my JoPs exactly where I want them. I have one by the house near the bridge so I can protect the mines and wire; one over the river and one on my right flank. I feel there’s enough space between them to ensure a barrage doesn’t restrict my deployment options. The British JoPs are very similar to the previous game.

The British get off to a brisk start with a double phase. The Platoon Sergeant (SL) deploys with two of the sections behind the hedgerow on the British right and they are all placed on overwatch.

 |
| The platoon sergeant lines up two sections behind the hedgerow |
The subsequent phase sees one of the British sections from behind the hedgerow makes its way across the road towards the house by the bridge.

 |
| A section moves across the road to the fence line |
The platoon 2" mortar team arrive and they fire a round of smoke towards the bridge. Their aim is slightly off and the smoke round drifts into the farmyard across the river. I suspect that's not the last of the smoke rounds we will be seeing from that mortar.

Armour support then arrives in the shape of a solitary Sherman.

The Germans, hampered by a British pre-game barrage, decide to bide their time and see how the British attack develops.
With the British starting to edge closer to the German JoP across the river, I decide now is as good a time as any to deploy. From behind the fence by the river I can engage the British section without exposing my squad to fire from the other British units. The squad successfully negotiates its way through the pre-game barrage and deploys.
 |
 |
 |
| The third British section deploys |
The Platoon Sergeant is busy issuing orders – he has the section behind the fence return fire at the German section, inflicting some shock; he also orders the mortar to fire smoke on the bridge, with more success this time.
 |
| The mortar lands smoke right on target |
In the subsequent phase the Platoon Sergeant orders the remains of the section at the fence to fall back out of the line of fire until they can be reinforced. The Sherman edges forward cautiously and it's no surprise to see a Forward Observer appear behind the hedgerow.
 |
| The battered British section pulls back to safety, awaiting reinforcement |
The Germans command roll gives them a double phase, but there's not a lot I want to do, or deploy, so I use both phases to activate the squad Obergerfreiter (JL) and rally off shock.
The British FO calls in a ranging shot on the bridge and this comes down accurately. It's making my squad feel rather nervous. After their brief moment of glory they could find themselves in a very tricky spot if the full barrage comes down.
 |
| The FO calls in a ranging shot.... |
 |
| ....and it's right on target. |
The British then deploy an engineer demolition team behind the hedge (it's a busy jump off point at the moment). Meanwhile the newly arrived British section moves across the road to reinforce the weakened section so that both can renew the advance on the house near the bridge.

The Sherman continues to edge forward ready to provide close support.
 |
| British pressure starts to build |
With the barrage ranging shot looking ominous I decide the best place for my squad to be is close to the British, it might actually be their best protection. So my squad moves over the fence and into the orchard. This forward defence was always going to be a bit of a gamble, but given the few defendable locations I think it's a risk worth taking. It may make sense to try to whittle down British force morale from the earliest opportunity.
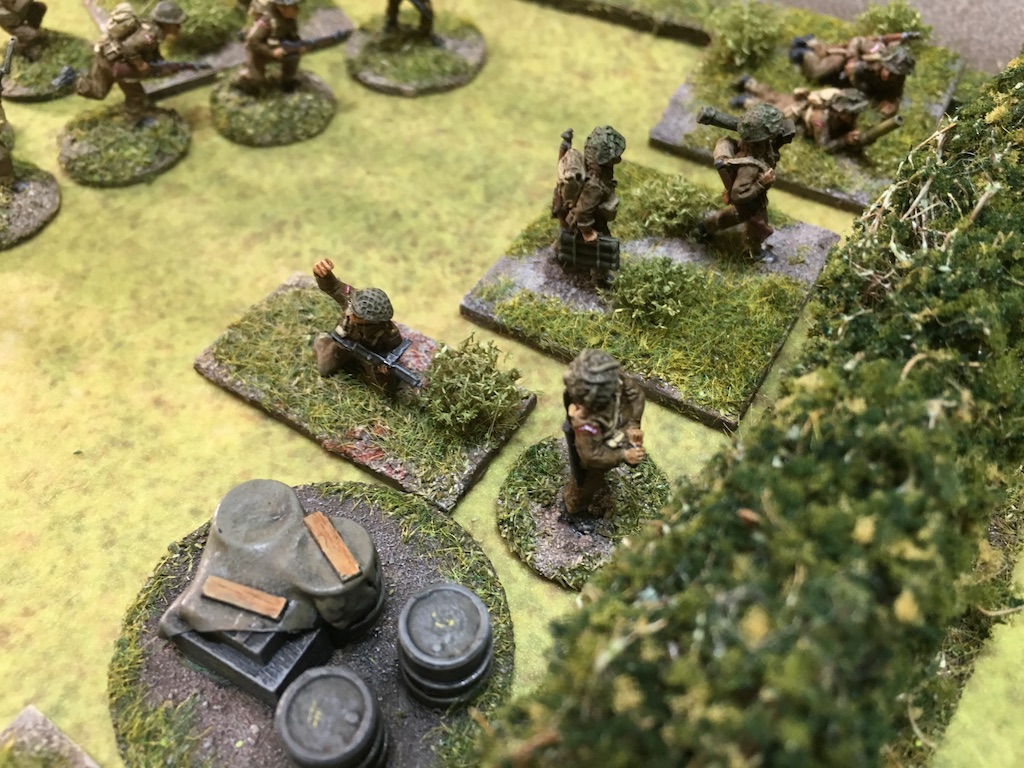
The British luck continues with their third double phase and so they continue to push forward. The Platoon Sergeant crosses the road and orders the two British sections to return to the fence line, they now have the numbers to take on the German squad.


The Sherman continues to move forward and the pressure is really starting to build up. A second 2" mortar team deploys to add to British smoke-making capability and a mine clearing team appears, ready to make a move towards the bridge.
 |
| Two mortars and the mine clearing engineers |
In the next phase the Platoon Lieutenant (SL) arrives and orders both sections behind the fence to fire. It's a 25 dice attack and the Germans take 16 hits. The LMG team takes two casualties and the rifle team take one and between them they accumulate nine shock which means the squad is now pinned. The 2" mortar fires a round of HE and adds one more shock. The German squad has found itself in quite a bit of trouble.

The Obergefreiter does his best to try to deal with the situation. He assigns a rifleman to the LMG team so the gun can fire at full effect and orders the whole section to return fire - it's a miserable four dice attack after accounting for shock and pinned, but it's probably the best option. It inflicts a single point of shock.
In the British phase the Platoon Sergeant rallies off shock and orders the full section to fire, while the weaker section goes over the fence and throws grenades. Being pinned puts the Germans in hard cover and this probably saves them from breaking. The end result is the German LMG team is wiped out and German FM drops by one to eight. More ominously the Sherman arrives at the fence line.

 |
| The LMG team is wiped out... |
At this point it's clear the British have only the single tank in support, so I see no reason to hold the panzerschreck team back. They deploys successfully despite the pre-game barrage and rolls a 7 exactly what they need to hit.
 |
| ....but the panzerschreck appears... |
With an AP strike of 13 it scores 8 hits and things don't look good for the Sherman. Sure enough, with only two armour saves, the Sherman explodes in flames. British FM drops three points for the lost tank and its commander (JL).
 |
| ....and does some devastating work. |
To make matters worse it is within 4" of the infantry section and the explosion causes a further two casualties, one of whom is the section Corporal, who is killed taking British morale all the way down to five. Bringing the Sherman that close to the German infantry was a huge risk given they have panzerfausts and a panzerschreck and the British have paid the price.
That was a very satisfying result and that's the second Sherman destroyed in the campaign (the British have a maximum of eight Shermans and two Fireflies, so still plenty more to come, but nice to whittle them down a bit). That said, this still leaves the remnants of my squad and the panzerschreck team in a tight spot.
British vengeance is swift as both sections return fire, killing one of the panzerschreck team and one of the rifle team and inflicting enough shock for both to break. German FM drops two points and is now at six. Routing units normally ignore terrain when calculating distance, but as the river is impassable we played it was not possible for the units to rout back across it, unless it was via the bridge, so we moved them in that direction. The men will now pay the price for deploying over the river, they cannot retreat through the wire and minefield, so are likely to be lost on the bridge. Unless I can build up a CoC dice very quickly my JoP will be lost too. If I end up winning this scenario it will mean a very weakened German force for a follow up game. While they have done a fine job pushing down British force morale, they have put me at risk of lowering my own force morale and that was something I hadn't factored into my planning.

I now wonder if I should use another squad and deploy them to the JoP over the river? It's a tough call because the threat of the barrage remains, but it's tempting to think about trying to hold the British this side of the bridge. With their force morale at five it is an option worth considering, but in the end I decide I'll anchor the rest of the defence on the other side of the river.
With this first line of German resistance broken the British use the following phases to move units forward. The smoke around the bridge provides good cover and I decide to hold back for now. I know the moment the British detect my presence the barrage will come crashing down and so there is no benefit to giving away my position just yet.
 |
| A section and the engineer demolition team move forward |
 |
| British sections occupy the orchard |
The broken squad and panzershreck team are stuck on the bridge and it's not long before the British section that lost four men in the firefight get their revenge. Advancing through the smoke they send a lone rifleman, the only survivor of the rifle team to contact the panzerschreck team who, unable to rout any further due to the wire, must surrender. That sees the loss of a support team and FM drops to five. Next phase the lone rifleman takes the surrender of the rifle team and the Obergerfreiter (JL) and German morale drops to four. This is perhaps more costly than I had planned.
 |
| The lone rifleman emerges from the smoke and onto the bridge |
 |
| With nowhere to run the Germans surrender |
With that the engineer demolition team make their way to the bridge, supported on both flanks by advancing sections, who also make contact with the German JoP.


The price of rolling only four dice becomes apparent when I roll 6,4,4,4 which is of no use and so the phase passes to the British. It comes as no surprise that Dave will use a CoC dice to end the turn and capture the JoP. With my FM so low I use my only CoC die to avoid the morale roll. Meanwhile the British consolidate around the bridge, ready to send the demolition team over to remove the wire.
I deploy a second German squad into the farmyard and fire across the river at the British section on my left flank.

The Corporal is hit and wounded and with British morale low Dave uses a CoC die himself to avoid the morale test. The section takes four shock.
Having made figures to represent wounded leaders I often forget to use them, so it was good to remember this time. You can see how I made these in the post Wounded leaders for Chain of Command.
The British respond by adjusting the ranging shot for the barrage further back from the bridge. They will want it to come down in a way that isolates the Germans in the farmyard, but allows the demolition team to get to the wire. The section behind the hedge across the river returns fire, inflicting some shock before calling on the 2" mortar for some smoke. It's a well aimed shot that blankets my squad.

The next German command roll is 6551. Again, not very useful. It's time to throw caution to the wind. My force morale is dangerously low and could easily slip lower. The same could be said for the British, so I need to try to do as much damage as I can, while I can. With that I deploy the Flak 38 on my right flank where it can target the British left flank.


The lone engineer on the bridge advance tactically with his charges toward the wire. Keeping away from the bridge walls and possible line of sight of the Flak 38.

Meanwhile the FO calls down the barrage.


In the follow up phase the command dice are 6551. It gives me a CoC dice, but very limited options with the 1. It's enough to activate the LMG team in the upper level of the house and they manage to cause one casualty and some shock. While the British are slowly taking casualties none of them are enough to impact his force morale, which is what I really need right now.
The British return fire at the building and inflict some shock and in a rare use of HE one of the 2" mortars also fires a round at the house and adds to the shock. The FO brings the barrage 6" closer to the river, but the house is sturdy and the German squad suffers no ill effects.
With my squad isolated in the barrage and the Flak gun shrouded in smoke I use my recently acquired CoC die to end the turn. Without a CoC die himself, Dave is unable to keep the barrage going and this might be enough to give the Germans an edge. This is a close run thing at the moment. While the British have a larger force, their morale is low and it's not over yet by any means.
That done, the German command roll is disappointing - 6422. I really wanted to activate the Flak 38. My squad in the building is still under the barrage, even though it will cease after this phase and so the phase passes to the British.
The Platoon Sergeant organises the units behind the fence and they pour fire across the river at the now exposed Flak 38. The gun is in the open and the fire is devastating (16 dice) and results in four casualties, the only survivor is the gun crew commander (JL) and so the team is wiped out, taking German morale down to three.
The FO tries to connect with the mortary battery, but has no luck and won't be able to try again until the next turn. Another well aimed round of smoke from a 2" mortar screens off the house by the bridge providing valuable cover to the demolition team. It looks like things are swinging the British way.

With only three command dice the Germans don't have many options, but it's clear the lone flak gun commander is an inviting target, not least because any wounds he suffers will put further downward pressure on German morale. The command role is 621 and so, pathetic as it is, I make up a 3, activate the junior leader and have him move tactically towards the rear.
The British sense victory is close. The demolition team set their charge but it fails to remove the wire. While that is a setback the German flak gun commander proves an inviting target. A section fires at him but none of the three hits are enough to cause a wound and that's not the end of it, a 2" mortar then fires HE at him but misses.
In an effort to save the flak gun commander the Germans deploy their final squad nearby and fire back at the British section and increase their level of shock.

Meanwhile the German squad in the house by the bridge moves to ground level in anticipation of a breakthrough at the bridge.
The British now come in for the kill and all sections try to target the squad and leader in the open. The section on the bridge moves slowly and fires at half effect, while all the other sections fire normally.
It's not good. There are five casualties and the flak gun commander is wounded taking German FM down to one.
Down to two command dice I roll a 5 and 4. I bring on my Unterfeldwebel (SL) and try to rally the squad in the open and have them return fire, which they do to no effect. With that the British then return fire and inflict four casualties. The LMG team is wiped out and German morale slumps to zero. With that the Heer platoon dissolve into the countryside, unlikely to fight again. The British have their victory.

That was a very enjoyable game and there was a stage where it could have gone either way. The fight around the orchard and the loss of the Sherman really knocked British morale, but the Germans on that side of the river were trapped and their loss was to have just as much damage on German morale. That was not so apparent at the time, but once they had broken and routed it was clear they were doomed. Knowing that, I do wonder if it would have been worth making more of a stand on that side of the river and taking the fight to the British? With the Sherman out of the way, it might have been possible to limit the effectiveness of the barrage by keeping in closer proximity to British units. That's one to ponder as we move on to the next scenario.
The British suffered a total of nine casualties from the platoon plus two from the supporting engineers. However the British held the field with their victory and the net difference in force morale (British 5, German 0), meant five of those casualties were immediately returned. As a result this platoon suffers two permanent casualties, so is now down a total of five men.
Of the three British platoons, one is at full strength, this one is down five men from the rifle sections, and, the platoon that struck the supermine in map 2 is down one full section.
It has taken the British four campaign turns to get this far. From Turn five onwards the Germans can now roll for additional reinforcements, with a -1 to the die roll for as long as map five remains out of British hands. That's all well and good, but now we must return to the uncertainty that is Endkampf. Will the next German unit decide to stand and fight?
You can follow what happens next in The Road to Bremen Scenario 4.
All the campaign AARs for this and other Chain of Command pint-sized campaigns can be read at Chain of Command campaign AARs


 |
| The German JoP is contacted by the British |
The price of rolling only four dice becomes apparent when I roll 6,4,4,4 which is of no use and so the phase passes to the British. It comes as no surprise that Dave will use a CoC dice to end the turn and capture the JoP. With my FM so low I use my only CoC die to avoid the morale roll. Meanwhile the British consolidate around the bridge, ready to send the demolition team over to remove the wire.
I deploy a second German squad into the farmyard and fire across the river at the British section on my left flank.

The Corporal is hit and wounded and with British morale low Dave uses a CoC die himself to avoid the morale test. The section takes four shock.
 |
| I get to use one of my wounded leader figures |
Having made figures to represent wounded leaders I often forget to use them, so it was good to remember this time. You can see how I made these in the post Wounded leaders for Chain of Command.
The British respond by adjusting the ranging shot for the barrage further back from the bridge. They will want it to come down in a way that isolates the Germans in the farmyard, but allows the demolition team to get to the wire. The section behind the hedge across the river returns fire, inflicting some shock before calling on the 2" mortar for some smoke. It's a well aimed shot that blankets my squad.

The next German command roll is 6551. Again, not very useful. It's time to throw caution to the wind. My force morale is dangerously low and could easily slip lower. The same could be said for the British, so I need to try to do as much damage as I can, while I can. With that I deploy the Flak 38 on my right flank where it can target the British left flank.


With two British sections and the engineer demolition team all within 4" of each other, there are plenty of targets. The Flak fire is not particularly effective, but it does cause a casualty in the engineer team and inflict some shock on the other units. The British squads return fire on the flak gun, killing one of the crew. They then call for smoke from both of their 2" mortars, but their accuracy is off and the rounds fall behind the flak gun.


In the German phase the squad in the farmyard move out of the smoke and into the house by the bridge. The Flak gun continues to target the same units, this time causing two casualties from one of the rifle teams and yet another from the engineer demolition team leaving it with a sole survivor tasked to clear the wire.
More rounds of smoke from the 2" mortars finally hit their target and the Flak gun is blinded in thick smoke.

 |
| The demolition team are down to a single man |
More rounds of smoke from the 2" mortars finally hit their target and the Flak gun is blinded in thick smoke.

The lone engineer on the bridge advance tactically with his charges toward the wire. Keeping away from the bridge walls and possible line of sight of the Flak 38.


The command roll for the Germans is a mixed blessing - a double phase, but with only four dice it means there are not many options. However it's enough for the squad in the house to move to the upper level where it should be able to target some of the British sections across the river.
 |
The British return fire at the building and inflict some shock and in a rare use of HE one of the 2" mortars also fires a round at the house and adds to the shock. The FO brings the barrage 6" closer to the river, but the house is sturdy and the German squad suffers no ill effects.
With my squad isolated in the barrage and the Flak gun shrouded in smoke I use my recently acquired CoC die to end the turn. Without a CoC die himself, Dave is unable to keep the barrage going and this might be enough to give the Germans an edge. This is a close run thing at the moment. While the British have a larger force, their morale is low and it's not over yet by any means.
That done, the German command roll is disappointing - 6422. I really wanted to activate the Flak 38. My squad in the building is still under the barrage, even though it will cease after this phase and so the phase passes to the British.
The Platoon Sergeant organises the units behind the fence and they pour fire across the river at the now exposed Flak 38. The gun is in the open and the fire is devastating (16 dice) and results in four casualties, the only survivor is the gun crew commander (JL) and so the team is wiped out, taking German morale down to three.
 |
| It's lonely out here without the gun crew..... |
The FO tries to connect with the mortary battery, but has no luck and won't be able to try again until the next turn. Another well aimed round of smoke from a 2" mortar screens off the house by the bridge providing valuable cover to the demolition team. It looks like things are swinging the British way.

With only three command dice the Germans don't have many options, but it's clear the lone flak gun commander is an inviting target, not least because any wounds he suffers will put further downward pressure on German morale. The command role is 621 and so, pathetic as it is, I make up a 3, activate the junior leader and have him move tactically towards the rear.
The British sense victory is close. The demolition team set their charge but it fails to remove the wire. While that is a setback the German flak gun commander proves an inviting target. A section fires at him but none of the three hits are enough to cause a wound and that's not the end of it, a 2" mortar then fires HE at him but misses.
In an effort to save the flak gun commander the Germans deploy their final squad nearby and fire back at the British section and increase their level of shock.

Meanwhile the German squad in the house by the bridge moves to ground level in anticipation of a breakthrough at the bridge.
The British now come in for the kill and all sections try to target the squad and leader in the open. The section on the bridge moves slowly and fires at half effect, while all the other sections fire normally.
 |
| A lot of fire is brought to bear on the German squad |
It's not good. There are five casualties and the flak gun commander is wounded taking German FM down to one.
 |

That was a very enjoyable game and there was a stage where it could have gone either way. The fight around the orchard and the loss of the Sherman really knocked British morale, but the Germans on that side of the river were trapped and their loss was to have just as much damage on German morale. That was not so apparent at the time, but once they had broken and routed it was clear they were doomed. Knowing that, I do wonder if it would have been worth making more of a stand on that side of the river and taking the fight to the British? With the Sherman out of the way, it might have been possible to limit the effectiveness of the barrage by keeping in closer proximity to British units. That's one to ponder as we move on to the next scenario.
The British suffered a total of nine casualties from the platoon plus two from the supporting engineers. However the British held the field with their victory and the net difference in force morale (British 5, German 0), meant five of those casualties were immediately returned. As a result this platoon suffers two permanent casualties, so is now down a total of five men.
Of the three British platoons, one is at full strength, this one is down five men from the rifle sections, and, the platoon that struck the supermine in map 2 is down one full section.
It has taken the British four campaign turns to get this far. From Turn five onwards the Germans can now roll for additional reinforcements, with a -1 to the die roll for as long as map five remains out of British hands. That's all well and good, but now we must return to the uncertainty that is Endkampf. Will the next German unit decide to stand and fight?
You can follow what happens next in The Road to Bremen Scenario 4.
All the campaign AARs for this and other Chain of Command pint-sized campaigns can be read at Chain of Command campaign AARs
Excellent report as always very enjoyable you have a knack for reporting! I noticed the British are a mix of PSC and Caesar what else was used? What would be nice is to post pics of the forces at the the start of the campaign you know Platoon one two and three etc and with pics of possible support units for both sides just to have us visually connect the forces to the battle as it progresses.
ReplyDeleteThanks GReg. As well as the manufacturers you mention, many of the remaining figures are metals from AB. Good idea about posting the platoons at the start of the campaign, I’ll keep that in mind for future AARs.
DeleteHi. Your reports are really valuable to me - I am just being introduced to CoC and have yet to actually play a game. So it is good to see how the game develops, especially in the context of a campaign. Thanks and keep up the interesting work. Chip.
ReplyDeleteHi Chip, glad to know you find these valuable. I hope you end up enjoying playing these rules as much as I do, they really do give a great feel for WWII at this level.
DeleteThanks again for the report. A question about jops in this game. My understanding from other campaigns is that they remain as for the previous game.
ReplyDeleteThanks. With the JoPs I think that may only have applied in one specific campaign. My understanding from other campaigns is play starts afresh with a patrol phase as usual on the second playing. In some cases, like this campaign, all fixed defences remain as per the first scenario and I know in other campaigns there are specific rules that guns must remain in the same location, but those are campaign specific rules rather than general campaign rules. That's my understanding, at least.
DeleteGreat report as always. I'm enjoying this series of AARs
ReplyDeleteThanks Colbourne, always good to hear that people are enjoying these.
DeleteThoroughly enjoying these reports. I'm still busy painting my forces as I have to assemble both sides but a great insight to the rules and to the supplements.
ReplyDeleteLove the figures.
HI Graham, thanks and I'm certain you will find CoC a very enjoyable and rewarding game. I've tried many WWII tactical systems and CoC gives a great feel for the period and some very plausible historical outcomes. I can't recommend it enough.
DeleteEnjoyable AAR reports on all the games up to this point, Barrage markers look very effective. Got to get into starting one of the Campaign games from the Lardies.
ReplyDeletecheers John
Love your work, you have inspired quite a few of my projects and some terrain!
ReplyDeleteHi Cryptiks, thank you, that's great to hear. You know, you put your stuff out there, but you have no idea if it's of any use or even interest to anyone, so it's great to get this sort of feedback.
DeleteHighly enjoyable. I think the next Sherman crew to deploy will be a lot more cautious!
ReplyDeleteWell fought, rotten luck with the quad 20mm. I thought for sure you would chew up the British section on the fence. I’m guessing you rated the fence as hard cover, so the 20 should have knocked it down to light, or open if the fence was light cover. I would have thought 12 to 14 dice would have done some serious damage.
ReplyDeleteBut it was nip and tuck to the end!
Thanks for the great read, absolutely gripping. I've tried to write AARs myself, and found the record keeping required during the game to be quite onerous. I have a question about using the CoC dice to end a turn; I always thought ending the turn would end the phase, so you need to do it after you've used your activation dice, or lose them. Same with rolling triple 6's, we've always played the phase and then ended the turn before rolling the Command dice for the second of the double phases. Is this wrong, I notice you end the turn and then play your dice, which is much more powerful as you remove smoke and overwatch, so perhaps it makes more sense. I know you can play your CoC dice at your own discretion, so perhaps you're ending the turn at the end of your opponent's phase?
ReplyDeleteYou can play the CoC die to end the turn at any time, however if the activation dice have been rolled then you must see through the phase. If you roll it in between phases then this rule would apply "Which player is active in the next Phase will be determined by the last set of Command Dice rolled as normal" so the phase does not 'end' as such, only the turn. So if my opponent has a phase and rolls one or less 6s then I have the next phase. Ending the turn with a CoC dice is a separate event, not linked to a phase and as the rule says the next phase is determined by the last set of command dice. So yes, you could roll a double phase, complete the first phase, then before rolling for you subsequent phase using a CoC die to end the turn, carry out all the end of turn activities and then make the command roll for you second phase. Quite powerful/useful as you note. I hope that makes sense.
Delete