
Ever since the British attack stalled in the fields outside Rauray the Germans have been on the counterattack. Having come so close to achieving their campaign objective the British found themselves bundled back all the way to Fontenay. There, in the previous game, the German advance was brought to a halt.

The British now resume their offensive and we return to St Nicholas farm, the scene of several actions in the campaign so far.

Unfortunately the German counterattacks have seen the initiative slip away from the British and an outright campaign victory is beyond them. However that doesn't mean there is nothing left to fight for. The aim of the campaign is to clear the flank for the forthcoming Operation Epsom. If they can evict the enemy from St Nicholas in the final two games it will prevent the Germans from winning a major victory with consequences for our next campaign (Scottish Corridor). It's the best the British can hope to achieve.
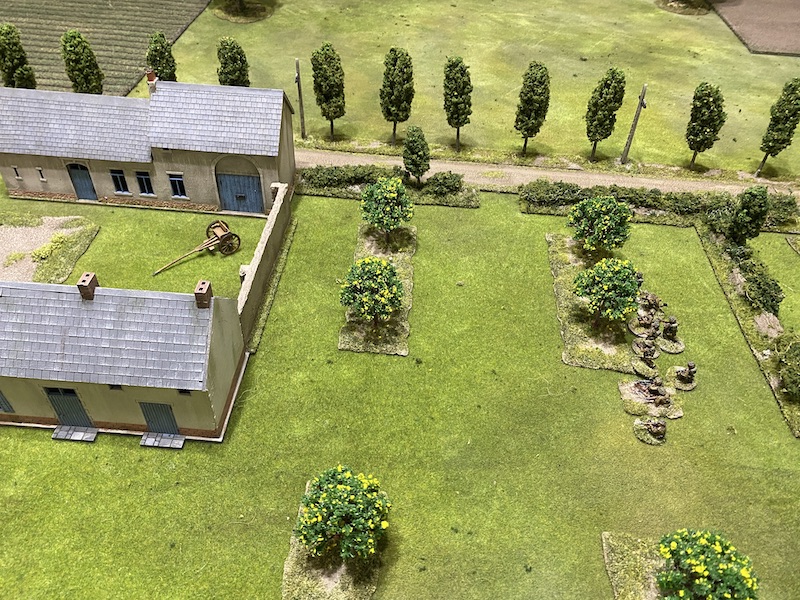
With all that said, St Nicholas farm is a tough nut to crack. The British are not short of support, the problem lies in the very open nature of the terrain and the limited covered approaches. It will be difficult for them to build up a solid base of fire without exposing themselves to deadly return fire. As you can see below, once they reach the farm the British have three choices - to either go through the farmyard or around one or both flanks. All of which entail crossing open ground in the face of potentially devastating fire.

When the British launched their first attack on the farm the Germans made the mistake of concentrating their anti-tank weapons on the right side of the buildings, that allowed the British to sweep around the open flank with their armour and unhinge the defence. It's hard to imagine Dave allowing this to happen again and I envisage a much tougher struggle this time around.
The Churchill AVRE is the support option that looks like it might provide the key to cracking the defence. It has the ability to demolish buildings with a single round and the threat alone will be enough to give the Germans second thoughts.

I have twenty two support points for this game (twenty for the scenario, plus one for the CO's high opinion and another for a second attack on this table). I've decided to call on a Churchill AVRE, a Sherman, a forward observer for a 3” mortar barrage and an additional infantry section. It is also time to replace the initial platoon from the Royal Scots Fusiliers, they have suffered too many casualties to remain effective. I will now call on a fresh platoon from the Duke of Wellington's Regiment to continue the campaign.
The British have an encouraging start with six free moves to open the patrol phase. That gives them a couple of advanced jump-off-points and prevents the Germans deploying in front of the farm. They also begin with higher force morale - the British will be at nine and the Germans at eight. A promising start.

The bright opening continues with a British command roll of 66652. It's an ideal opportunity to take full advantage of the double phase and advance units as close to the farm as possible before the Germans can respond. The support section deploy into the orchard nearest the farm buildings.

In the subsequent phase the platoon sergeant deploys at the jump-off-point.


The rapid advance forces a response from the Germans. They cannot risk another run of British phases and the closure of their jump-off-point in the farm. A panzer grenadier squad takes up overwatch positions in the ground level of the farmhouse.


The following British command roll is 65521 which sees them accumulate their first full CoC die early in the game. That could prove very useful.
The support section move swiftly through the orchard to the cover of the high farm walls.


Dave senses this is probably the case. During the German phase he chooses to bide his time, waiting to see what I plan to do next.
The following British command roll is 44443. Not the most useful but it allows me to bring on the Churchill AVRE. It has some way to come so I will need to be patient and not attempt anything rash until it arrives.

Meanwhile, the platoon sergeant makes his way forward through the orchard.


Once again the Germans choose to watch and wait, so in the following British phase the Churchill AVRE continues rumbling toward the farm.

The sergeant moves up to join the section at the wall.

From there he directs the men to the hedgerow alongside the road.

The Germans then have a double phase but other than accumulate more CoC points they continue to watch and wait.
In the British phase the AVRE continues moving slowly through the orchard. Given the lack of cover on the table I suspect I will need to create my own. Fortunately the British have just the weapon for this and the 2” mortar team deploy with their ample smoke rounds.


What then follows are a series of phases where not much happens of significance other than the accumulation of a fair number of CoC points by both sides. That gives the Germans their first full CoC die and sees the British come very close to their second. Until he can ascertain what the British have planned Dave continues to delay any further deployment. As for the British, their limited command options are focussed on moving the AVRE through the orchard.
The sequence ends with a British command roll of 66442 and an opportunity to push the attack with a greater sense of urgency. The sergeant orders the support section to climb the hedge into the road with the aim of working their way into the farm building.


The sergeant then moves to within command range of the 2” mortar team and he calls them forward.


A second section deploys into the orchard near the AVRE.

In the following phase the sergeant orders the support section into the farm building. I'm not sure this is an ideal position, but at least it moves them further forward and offers hard cover.

The sergeant moves up to the hedgerow to join the 2” mortar team.

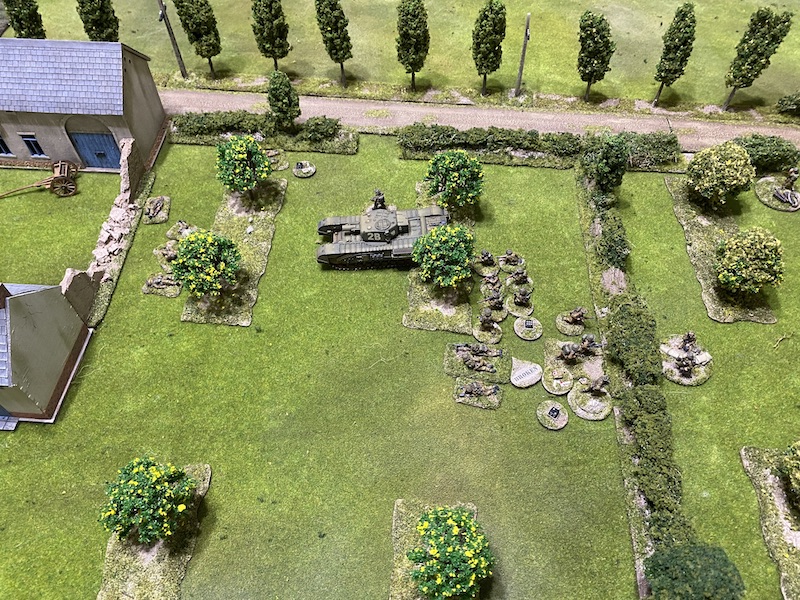
Meanwhile the AVRE rolls forward toward the farmyard wall.

The recently arrived section advances tactically alongside the Churchill. That now creates the possibility of the British breaching the farmyard wall and making the German position less tenable.

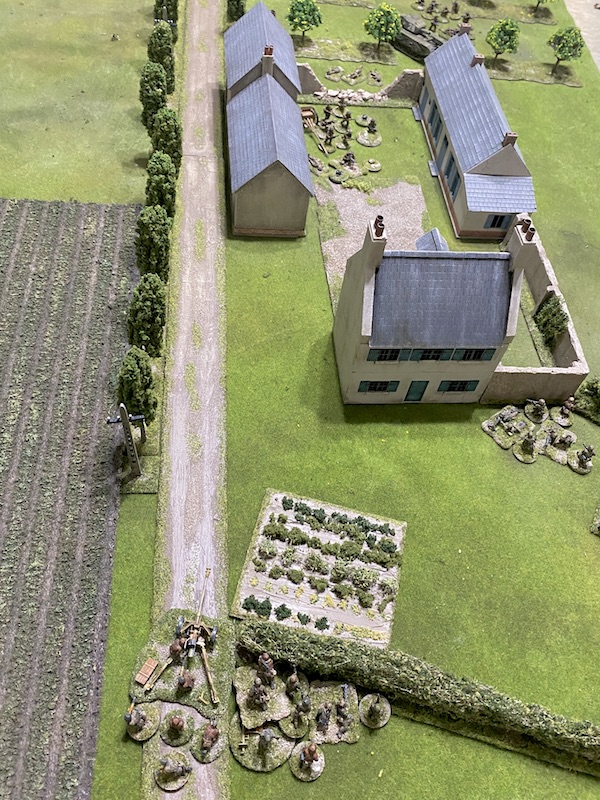
The threat finally provokes a German response. In their phase a second squad of panzer grenadiers deploys at the rear jump-off-point.

From there they can cover the road and open fields to their left. They also have a line of sight into parts of the farmyard. The squad's scharfuhrer puts both LMG teams on overwatch.

In the British phase the Churchill AVRE hurls a powerful HE round at the wall.


In the meantime the sergeant orders the 2” mortar team to fire smoke into the farmyard.


The breach in the wall offers light cover and the section by the AVRE moves forward to take up position there. As they do they are greeted by a hail of fire from the recently deployed German squad who have a narrow but clear line of sight across the farmyard.


The platoon sergeant is in danger of being caught up in the firefight and so he moves deeper into the orchard from where he can still retain command and control without putting himself at risk.


At this stage I'm feeling that my patience has been rewarded and the British are now in a decent position to attempt clearing the Germans from the farm. As always the enemy has a say in the matter and Dave has other plans. Before rolling his command dice he uses one of his CoC die to end the turn. That removes the 2" mortar smoke. It also removes the overwatch from the panzer grenadiers in the farmhouse but that is of less significance as the Germans have the next phase. Things could turn nasty for the section at the breached wall.

In the German phase a support oberscharführer (senior leader) deploys into the farmhouse. He wastes no time ordering the panzer grenadiers to engage the British section.

Given the amount of fire that's about to come their way I decide now is a good time to use a CoC die to interrupt. The section go tactical and make the most of the cover that is available.


The Germans are not finished with them yet. Now that the smoke has cleared the squad at the rear has enough of a line of sight it can target the entire section.


The Germans see this as a good a time as any to take on the AVRE. Ominously a Pak40 anti-tank gun deploys on the road at the rear of the table.


With the AVRE out of sight the Pak40 sends a round of HE at the section at the breach. The rifle team lose another man and acquire more shock and that's enough to see the section pinned.

That was a painful sequence of events that sees the British suffer a swift and violent riposte from the Germans. The first thing I do in the British phase is to have the 2” mortar team fire another smoke round into the farmyard.

It won't block all German line of sight but it should limit how much fire they can bring to bear on the section at the wall.

The AVRE is now beyond small arms range and so can spend the full phase reloading. I'm hoping I can bring it forward again soon and deal with the Germans in the farmhouse.

Several German units find their lines of sight now blocked by the smoke, but not all of them. The oberscharführer in the farmhouse uses machinengewehr to direct the fire of one LMG team that does.


Despite the cover the British suffer another two men killed which puts the section very close to breaking.

The Pak 40 may not have a line of sight to the breach in the wall but the crew is aware there are British infantry in one of the farm buildings.


It becomes obvious that Dave senses now is the time to go in for the kill. A third squad deploys in the open beside the farmhouse.

One of the LMG teams targets the 2” mortar team while the other targets what is left of the British at the breached wall.

That section loses another man and suffer more shock. It's enough to break them.


The 2” mortar team also lose one of the crew and suffer a point of shock.

While this has been a setback the British have other units yet to deploy and the AVRE is capable of changing the situation very quickly if it can bring its gun into action.


The sergeant moves to the 2” mortar, rallies the shock and has the surviving crew member fire more smoke into the farmyard.

While it will block British line of sight as much as the German it gives me some breathing space to bring forward the AVRE and reform the platoon to renew the attack.

The support section in the farmhouse make use of the smoke to move into the farmyard.

The following German command roll is 65522 which sees them accumulate another full CoC die. The oberscharführer in the farmhouse directs the squad in the open to climb back over the farm wall.

He then puts the two LMG teams with him on to overwatch.

In the British phase the Churchill moves toward the left flank of the farm and the recently deployed section joins it.


I try to build up British firepower and the Sherman is called forward.

At the same time the forward observer for the 3" mortar battery deploys from the left hand jump-off-point.


Before the German phase Dave uses his recently acquired CoC die to end the turn. I think I can see what's about to happen here. The broken section routs off the table taking the corporal with them and that sees British morale drop to five.


Little surprise that all the Germans in the farmhouse, including the two leaders with their machine pistols, fire at the support section which is exposed in the open.


The squad at the rear also opens fire at the same target.

The Pak40 has a line of sight to the Churchill.


At this point I think I can see the writing on the wall. British morale is so low that it's hard to see how anything can be salvaged from here. Before casualties become any worse I decide it is time to withdraw. I have one more shot at taking this table before the campaign ends. If I can succeed I will prevent a major German victory and limit the advantages they would take into the next campaign. That means there does still remain something worth fighting for, meagre as it is. How British fortunes have changed since the high water mark on Map 5.
They suffered eight casualties from the new platoon, which will mean four permanent losses and two wounded. As each platoon can call for replacements once in the campaign and we have only one game left now is the obvious time to do that. The CO's opinion is still quite high despite the recent setbacks and so four new men will arrive. That will put the platoon close to full strength fwhen we return to St Nicholas farm for the final game of the campaign. Can the British salvage anything or will it end with a resounding major victory for the Germans? You can follow what happens next in this post.
If you've enjoyed following along and would like to Buy Me a Coffee to help support the blog you can click through at the link or on the tab in the right hand column of this page.
You can find all the game reports for this campaign and for many others on the Chain of Command AAR page.
Oh dear! It all seemed to be going well for the British attack and then the vagaries of war kicked in. Another engaging report and splendid photos, let's hope the gods of war look kindly on you in the final game. Dave is certainly a tough opponent.
ReplyDeleteThanks Phil. Dave has certainly played a very canny game across the campaign. He's conserved his force very well and once the opportunity arose to counterattack he's exploited it to the full. That said, it's made for an enjoyable campaign with plenty of twists and turns.
DeleteA thought provoking game, raising a couple of questions and rule niggles.
ReplyDeleteI know I'm asking with the benefit of hindsight but:
1. Why did the first section move up and line the wall before the AVRE arrived - I could see no reason for that?
2. Why did you not bring your mortars into action to suppress the area beyond the farm before knocking the wall down?
Sorry if these sound like dumb questions, and the answer might just be it didn't occur to you - I often overlook the obvious and kick myself afterwards but I thought there might be a learning point here.
The rules bugged me slightly in this one for the following reasons:
1. The LOS for the Germans beyond the farm looked very tight and for it not have hindered their effectiveness seems unrealistic. In the second photo with a good overview of the table showing your planned advance it seems almost impossible to shoot through that gap unless on the other side of the road.
2. A cautious advance, surely a tactically sound approach, almost ensures the opponent will have several CoC dice by the time the action starts which means he can sweep away smoke screens at will. This feels wrong to me. I know an end of turn is supposed to be a lull in the fight / passage of time, but as in the case of this game, how can the opponent decide this happens just when you're pressing forward covered by smoke? Somehow how long smoke remains effective should be less predictable - perhaps a die roll every time play switches from the opponent to the owning player with smoke dispersing on a '6'? A cumulative scoring system would be more realistic but would require more counters just for the smoke.
Do let me know what you think about this - I like these rules so much it bugs me when I think something isn't just right.
Thanks Rob. To answer your questions:
Delete1. Why did the first section move up and line the wall before the AVRE arrived - I could see no reason for that?
To make sure the orchard would be clear of Germans and to not give them a chance to try a panzerfaust ambush by having infantry ahead of the tank. It would also force a German reaction of some kind which would help me locate his units.
2. Why did you not bring your mortars into action to suppress the area beyond the farm before knocking the wall down?
The main problem is where to put the forward observer so that he's not going to be a target. Lines of sight are a bit tricky.
The rules bugged me slightly in this one for the following reasons:
1. The LOS for the Germans beyond the farm looked very tight and for it not have hindered their effectiveness seems unrealistic. In the second photo with a good overview of the table showing your planned advance it seems almost impossible to shoot through that gap unless on the other side of the road.
That's the photos, to the naked eye the LOS was clear. The smoke base is 3" and that was our guide more than the fluff on the top which tends to overhang the base. I had no issue with the Germans seeing through, it was tight but clear enough (unfortunately).
2. A cautious advance, surely a tactically sound approach, almost ensures the opponent will have several CoC dice by the time the action starts which means he can sweep away smoke screens at will. This feels wrong to me. I know an end of turn is supposed to be a lull in the fight / passage of time, but as in the case of this game, how can the opponent decide this happens just when you're pressing forward covered by smoke? Somehow how long smoke remains effective should be less predictable - perhaps a die roll every time play switches from the opponent to the owning player with smoke dispersing on a '6'? A cumulative scoring system would be more realistic but would require more counters just for the smoke.
Yes, there is a suspension of disbelief issue with the game turns ending and it's difficult sometimes to give it a plausible explanation. It can feel a bit gamey at time. We live with the abstractions here, frustrating as they can be sometimes but no reason why you couldn't put in place a few house rules if you're not entirely convinced that it works.
Thanks for that, I knew you would have thought it out. It's a shame there's no mechanism for a map shoot with mortars as it wouldn't be unreasonable in real life to seal off the farmhouse by dropping a barrage beyond it. Of course that would allow a JOP to be suppressed... it would have to be expensive in points.
DeleteAs for the smoke, I might just try a far simpler house-rule where the smoke is removed after the player who enforced the end of turn finishes all their moves (they will be on multiple moves having rolled three `6's). That way the opponent knows the smoke is about to go so at least gets a chance to skedaddle or go to ground - of course they may not get the dice to do so. They could also try re-laying the smoke... hmmm, might have to try it to see how it plays.
In terms of casualties, don't forget the pinned section in the farm yard. You'll need to roll a D6 for each, with them being captured on a 1-2. That's potentially a whole bunch more losses (and thus a smaller force) going into the next game!
ReplyDeleteThey were a support squad, so any losses there would not have impacted the strength of the platoon for the next game. We noted that it should be done but didn't bother seeing as there were no long term consequences.
DeleteIt was all going so well until it wasn't.... is cruelly true.
ReplyDeleteanother great report and really splendid pictures. always a treat.
and now you aren't only doing linked games in a campaign but linked campaigns?
crazy cool 😁
I think Operation Martlet and Scottish Corridor are the only two campaigns that have a link. Each can be played independently but if you choose to follow Martlet with Scottish Corridor then there are a couple of nice additional features built into that campaign that let you determine the length of the campaign and the forces available to the Germans based on the outcome of Martlet. The other benefit is that while the British are attacking in Martlet they are defending in Scottish Corridor so both players get to play attacker and defender when you link both.
DeleteThat was tough go, you will do better next time.
ReplyDeleteI haven't read the campaign recently, but I think the stone walls can be breached by driving a tracked AFV through them. I think that would have been a better use of the Churchill AVRE and would have left you loaded for a shot at the farm house. Also, your support squad could probably have used it to provide some additional cover in addition to that provided by the breached wall. It might well have left the AVRE vulnerable to a Panzerfaust or Panzerschrek after the breaching but it seems nearly as exposed by doing the breach by firing although at slightly longer range.
ReplyDeleteAn excellent report and beautiful photography. Thank you. A really tough fight for the British but sometimes you just have to make the best of a bad situation. The very open flank made a narrow approach the only real option, but the consequence was predictable. Not sure there was a better option.
ReplyDeleteGreat AAR - shows how hard it is to sustain an attack I guess - when the Churchill AVRE breached the wall it was hard to see how the Germans could win but they snuck ahead somehow. Very interesting and informative...as usual!
ReplyDeleteI love these AARs, I can't wait for the next one and the new campaign. I've been trying to find people in Canberra to play 20mm CoC but it's harder then I thought haha.
ReplyDelete