

So the basis is a 1/72 (20mm) Armourfast Cromwell, a very simple kit with as little as 12 parts.

I cut a small piece of the gauze bandage and soaked it in a diluted solution of PVA glue. The PVA will help it adhere to the tank and once dry the fabric should become quite hard and easy to paint.


Once wet the bandage conformed to the shape of the tank and I used a pair of tweezers to adjust it to the shape I wanted. I was so busy trying to get a good shape that I forgot I had covered the driver and bow gunner's hatches, something that would be avoided in a combat situation. First lesson learned.

More bandage was applied in small pieces to the bow of the tank and around the turret, you really don't need much and there is no need to try and lay it as a single piece. I also added some thin strips of paper and masking tape, also soaked in the PVA solution, to represent some hessian tape. This was more an experiment just to see if it would work, rather than a full blown attempt at hessian.


Everything was left to dry for 24 hours. Once dry the bandage should go hard and adhere perfectly to the model.


Next was a coat of primer to seal everything in and give a uniform base colour to work from. I was very happy with the way it looked and this was the moment when I realised the process would work and it would be worth completing the model.


The first step in the painting process is to spray black along all the panels, edges and hatches.


Then I apply the base coat, in this case a mix recommended by modeller Mike Starmer for British SCC15 Olive made up of Tamiya Olive Drab and Dark Yellow. I spray this in a diluted form so that the darker black lines are subtly visible through the paint to delineate the various shapes.


The next stage is colour modulation. This technique attempts to highlight individual panels and the way light reflects differently from each surface. It involves masking off some of the edges and spraying progressively lighter shades of the base colour. I hold a piece of card along an edge and spray carefully, slowly working my way around the model.


At this stage it looks almost hyper real and a bit like a cartoon, however the weathering process will temper this down quite a bit. I make up a light mix of the base colour using Vallejo Olive Drab and Dark Yellow and using a fine brush apply this to prominent areas like hinges and other raised features. It's not unlike the effect you aim for when dry brushing using lighter shades but done in reverse order.

With that done the entire model is coated in gloss varnish, ready for decals and a pin wash.

The 7th Armoured Division had Cromwells in their tank regiments and these served from Normandy onwards so that seemed a good choice of unit for this particular tank. Also, as you can see I have no shortage of decals for that division.

Decals were applied and I use Microscale's decal softener to help them bed down properly, although in this instances the decals were small and there were no irregular shapes to conform to, so it wasn't entirely necessary.


These were sealed under more gloss varnish to protect them from the highlighting and weathering processes to follow. The first of which is a pin wash. This consists of a Winsor & Newton Vandyke Brown oil paint heavily thinned. The idea is to let the gloss varnish and capillary action draw the wash into the panels and around bolts. You do this by touching a fine brush loaded with the wash on the parts of the model where you want the lines to be visible.


Any excess paint that flows out of the recesses can be wiped away using a cotton bud. As the bud will absorb a lot of the paint it is best to wait until the paint has dried a bit before doing this.

The wash will take a while to dry completely but if you're impatient you can speed it up by blowing gently with a warm hair drier. Once dry the whole model is given a coat of Testors Dullcote matt varnish.
The next stage of weathering could be referred to as chipping. I'm not sure if the paint on tanks really chips in the way some people represent it, but there is no doubt it gets scuffed, scratched and worn. What I attempt to do is a little stylised but the aim is to give the impression of heavy wear. This is a tricky process, not least because it is very easy to over do it. The first stage is to mix a lighter shade of your base coat and with a fine paintbrush pick out areas that would get a lot of wear. Places like hatches, the dust skirts and the engine deck.


I also use another technique with the same paint and that is to use a piece of soft sponge foam (the type you get in the packaging with electronic devices like mobile phones). Holding a torn piece in tweezers I dip it into the paint mix and then dab onto a paper towel to take off some of the excess. I then dab very gently around raised corners and edges. Again, less is more. A good guide is that when you think you have done enough it is probably when you've done too much.


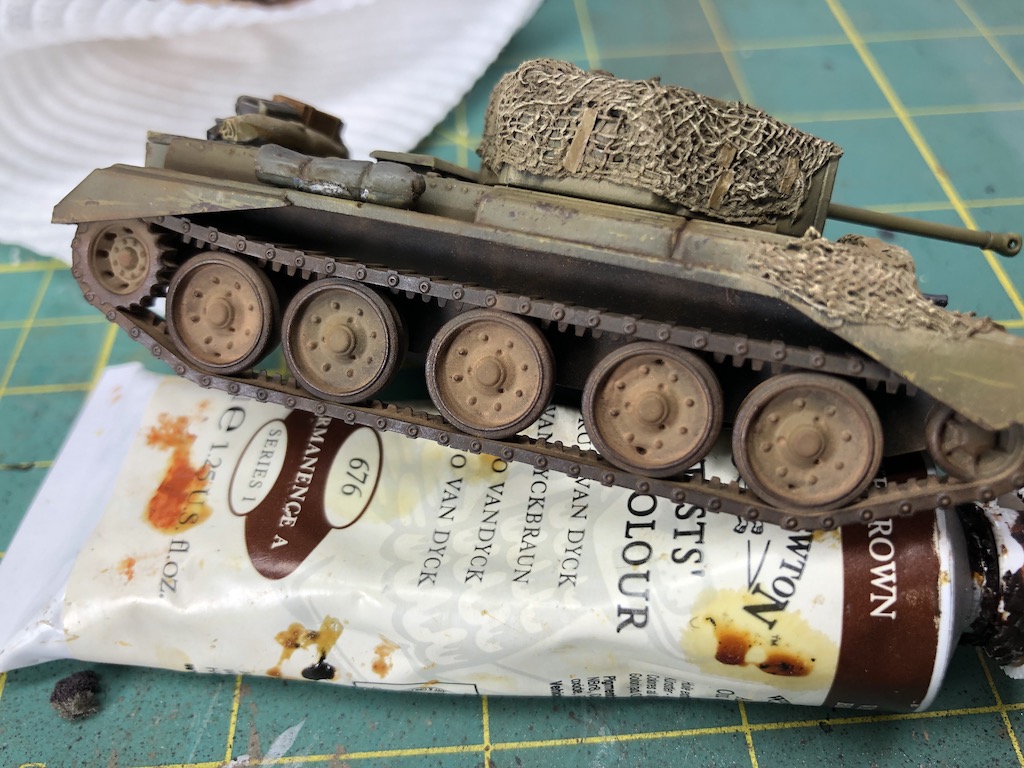
At this stage I painted the netting and MGs before adding some stowage.


The colour modulation has been broken up a bit by the pin wash and the chipping, but is still quite marked. The next step is to begin the weathering the main paint work. The first stage involves streaking the paintwork using a mix of oil colours. For this I mixed Yellow Ochre with Lamp Black to get a light olive colour. I would use this mix as well Buff and Vandyke Brown to create the streaking.

This is done carefully by applying just the odd dot of the paint on vertical surfaces and then using a brush every so slightly damp with thinner and drawing down the paint until it almost disappears. You want something quite subtle here.


The main part of weathering involves the use of pigments. In this case some Europe Dust from MIG. This is applied with a brush directly onto the model. A little goes a long way and you don't want to smother the entire tank in the stuff. I concentrate mainly around the chassis and lower portions of the vehicle. I also put a small amount very lightly on any large horizontal surface like the rear engine deck and the top of the turret.

As the pigment is just a powder it won't stay in place unless you fix it. MIG make a pigment fixer although my understanding is that it's nothing more than a matt enamel varnish. I spray this in light coats over the pigments.

I do this several times to build up layers of dust and dried mud if required. Avoid the temptation to do too much at once, I think many people have a real tendency to over do this stage. I do one layer of pigment and then fix it and if needed add more layers. Much will depend on the overall effect you are after.

The pigments can create a very flat effect and as any small scale model needs to have its shape emphasised I highlight aspects of the wheels and tracks. For this I use dry brushing, but not with a lighter colour, rather a dark colour. Once again I resort to my trusted Vandyke Brown and also use Olive Green. The brown I dry brush to pick out the wheel rims and the tracks and the Olive is used to highlight those parts that would have been painted that colour originally.


I also use it to pick out bolts and other pieces. It's the reverse logic of the light shade dry brush and against the light colour of the pigment the contrast is very effective.


The final painting touch is a very light dry brush of the tracks using Vallejo's Oily Steel. You really only want to pick out the highlights and those surfaces that would touch a hard surface. There is little detail on the tracks for this model so unfortunately it doesn't demonstrate the technique particularly well.


There is something immensely satisfying about taking a model that is basic and simple and trying to elevate it into a finished product that belies its roots. Aside from adding a period touch to the tank I've realised that the netting also does a fine job of covering up some of the cruder details on the original, definitely a win-win.
So here it is, ready for action in North West Europe in 1944-45, perhaps to appear in a Chain of Command scenario or campaign during Operation Market Garden from the forthcoming Market Garden handbook currently in the works at Lard Island.

Beautiful work. It's amazing what can be done even in this scale.
ReplyDeleteThanks. For many years my modelling and gaming were separate. My wargames were board games and I modelled in 1/35, the two hobbies lived separate existences. With my return to miniatures I'm able to use some of the techniques I learned in larger scales and try to apply them in smaller scales.
DeleteGreat tutorial and great results. Thanks.
ReplyDeleteFrank
http://adventuresinlead.blogspot.com/
Thank you.
DeleteA splendid step by step, something there for beginner's and the more experienced.
ReplyDeleteThanks Phil. Yes, there's a few techniques there that I've carried across from my larger scale modelling. Probably more effort than is really needed for a gaming model, but the modeller in me can't help himself.
DeleteVery nice work :)
ReplyDeleteThanks!
DeleteReally nice idea to share on the netting and the tutorial is simply fantastic, blogging at its best - thank you.
ReplyDeleteThanks Norm, really appreciate that feedback.
DeleteExcellent looking Cromwell. If one listens close enough you can hear it running.
ReplyDeleteThat's the goal - somehow turn a featherweight bit of plastic into something that resembles 30 odd tons of metal!
DeleteI have a troop of Armourfast Cromwells to paint for What a Tanker so I well definitely pinching your camo netting method and painting tips. Brilliant!
ReplyDeleteGood luck, look forward to see the results.
DeleteExcellent work. I especially like the chipping technique. My own efforts at Cromwells in 1/72 some time ago tried to get the Hessian tape effect. http://aleadodyssey.blogspot.com/2014/05/liebster-awards-plus-cromwells.html to this; http://aleadodyssey.blogspot.com/2014/06/the-starfish-returns.html
ReplyDeleteThe paint job is nothing like as nice as yours, but I was still quite pleased with the Hessian effect, and it was very simple to do.
Thanks for sharing that, my next attempt will be to try something more ambitious and go for the hessian tape look. I have a PSC Sherman Firefly sitting in the paint queue and I'm very tempted to give that the treatment.
DeleteHi Mark,
ReplyDeleteStunning work as always. Seeing you apply the techniques and principles from your 1/35 scale modelling experience is illuminating. I certainly appreciate the extra attention to detail you give your models - particularly when it all comes together on the tabletop when it truly shines during your AARs. I must admit that one of the reasons I've gone with 28mm for my personal CoC collection is so I can justify not buying any AFVs...that and I no longer have the eyesight to paint 15 or 20mm figures to the level I would want - 28mm is about my limit these days.
I look forward to one day seeing one of your games at Bearz when I am next able to attend.
Very nice indeed, and a very interesting description of the steps involved.
ReplyDeleteGreat work. And very inspiring. Thanks for sharing the tutorial.
ReplyDeleteNice walk through of the process and the tank looks super great. Better painting and modeling than I’ve ever done. 😀
ReplyDeleteIt looks great. I'm sorry but for the lower hull and tracks you just prime grey and then add weathering etc? I didn't see you painting the tracks and rollers...
ReplyDeleteSort of correct. I spray the tracks and wheels black at the same time I'm spraying along the panel lines. When I spray the base coat I just carefully spray the centre of the wheels, it doesn't need to be totally accurate as the weathering covers most of it. As the pigment covers most of the paintwork there is little point painting prior, which is where the dry brushing with the oil paints becomes important in bring back some definition to those areas. Hope that helps.
DeleteWonderful tutorial here TP.
ReplyDelete